C# Bluetooth example – searching & listing devices in 2024
Inhaltsverzeichnis
- 1 A simple C# Bluetooth example
- 2 Prefering videos? Gotcha back!
- 3 My app needed a bluetooth upgrade
- 4 Library search and installation – C# Bluetooth example
- 5 Searching for bluetooth devices
- 6 Implementation inside a C# Winforms App
- 7 Implementation inside a C# WPF MVVM App
- 8 The list page ViewModel
- 9 Conclusion – C# Bluetooth example
- 10 Downloads
- 11 Related posts
A simple C# Bluetooth example
A simple and easy to use C# bluetooth example, this was the thing I was looking for in the last days. I needed it for my remake of my logistics software called „Motraso“, but let’s talk about that in a second. We will talk about the basic functionality considering the creation of a simple „BluetoothClient“ instance, which is able to list devices and more. I will also add some more functionality in a later post, or edit this one – stay tuned!
Maybe you want to take a look at my blog post considering an actual bluetooth call on your phone as well?
Prefering videos? Gotcha back!
In case you don’t want to read the text, here is an example with a Windows Forms Bluetooth application as video format. Keep in mind, that the blog post contains more details like with WPF, etc. – which is not covered in the video.
My app needed a bluetooth upgrade
So in my current remake of my logistics software „Motraso“, I wanted the user to be able to make a direct call through their app. Speaking about „direct“, I’m meaning the actual dial process without further interaction from the user – yay! So far, the webapp-version did something similar by just providing some hyperlinks with the corresponding a-tags.
This kind of behaviour is implemented in like every webbrowser-capable device by providing for example an email link:
<a href="mailto:john.doe@thedomain.com">The text you want the user to see..</a>Which would look like this here (no click intended..):
The text you want the user to see..Basically, this is pretty neat, as it’s supported in almost every modern device, but usually there will be some kind of confirmation. This also counts for the desired phone dial approach, which essentially works in the same manner:
<a href="tel:1234567890">Maybe display the phone number, or an icon..</a>Preview:
Maybe display the phone number, or an icon..This is not what I wanted – meh.. I wanted to provide some nice functionality to my users, where they can only click a button and voila – the device (like a phone, etc.) will just call that number. No need for user interaction, no special permissions, nothing! This is where I came up with another idea, using bluetooth!
I mean seriously, who wants to pull out his phone out of his pocket, just to say: „Yes, I REALLY want to call this guy using bluetooth“. So I’m pretty glad I stumbled upon the following library.
Library search and installation – C# Bluetooth example

So as always – time’s short, work being much – I thought about browsing some of the known sources for developers. For sure I did hit Stackoverflow (who would’ve thought of that..) and – as a .NET Dev – I did take a look into the NuGet packages. Pretty fast, I’ve found a big and nice library which I can actually remember working with in the past.
At that time I was working on a project for one of my former employers, which needed to connect to a machine measuring the kick-speed of a football player for a sports event. Yeah, yeah, I hear you – that’s another story, so back to topic. The library I’m talking about is called „InTheHand.32feet„.
My best bet was, to just install that library and try out some things and it worked so far. Later, when I actually went to dialing, etc. this was a bit more of a headache, but this will be content for another post (or an edit/update). So for now, you can go ahead and actually install the mentioned library by using the following steps.
Creating a new project, installing the 32feet lib
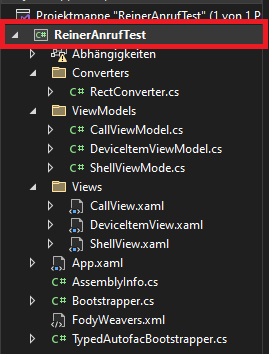
Open a new Visual Studio project (or use your existing one…) and make a right click on your project name on the right side, it should be listed inside the project folder explorer. Take care to actually hit the project itself, not the overview thingy. Please don’t get confused, as this is a german-named test-project for one of my customers. Just click the item with that little green C# icon in front of its text contents.
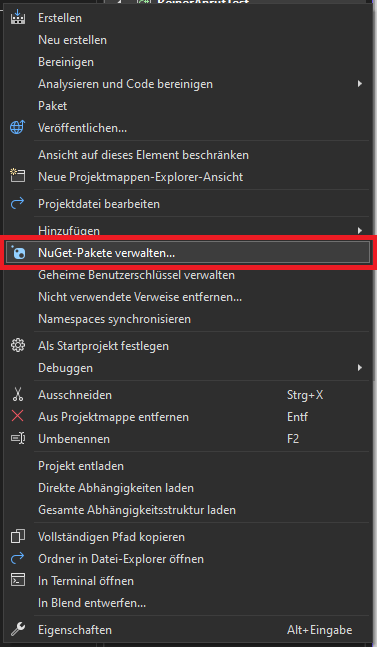
Now this context menu will appear, where you can click on the „Manage NuGet packages“-item (sorry, german as well..):
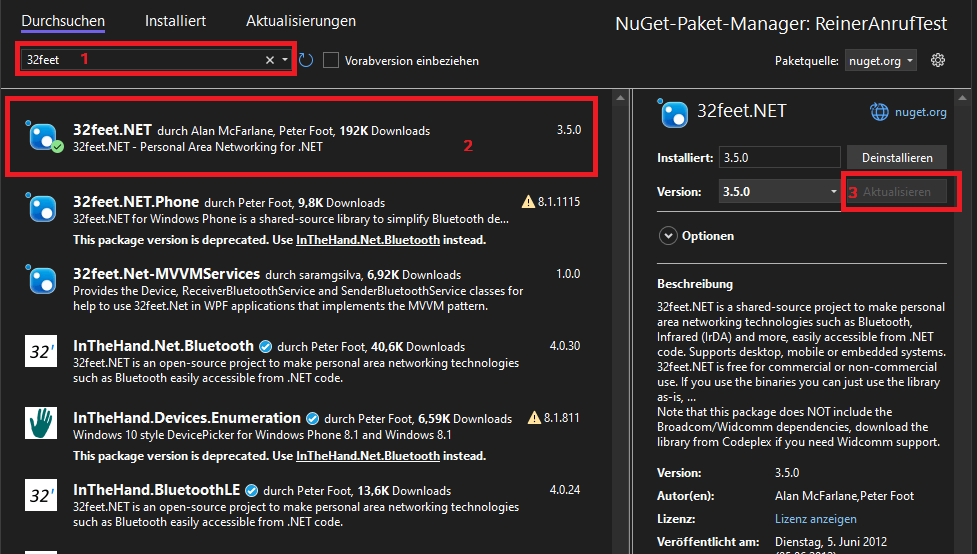
To finish up installing the needed library, just go ahead and search for „32feet“ in the box „1“. Then choose the correct package marked with „2“ and finally click „install“ on the right side, which should be number „3“. After the installation process has finished without any errors, you should be able to use the corresponding classes, functions and etc.
If the NuGet paket manager doesn’t display the check mark thingy right away, just refresh or close and open it up again. This is some kind of pretty well known bug inside the package list, so no need to panic.
Searching for bluetooth devices
In the last/main step, we are going to actually search for devices. To be able to do so, you need to create an instance of the „BluetoothClient“-class, which is inside the „InTheHand.Net.Sockets“-namespace. Keep in mind, that I’m using the shortcut / inference styled initialization syntax for the variables. You can do it like this:
Instantiating the BluetoothClient
var bluetoothClient = new BluetoothClient();
Dim bluetoothClient = new BluetoothClient()
If you prefer that explicit writing style (which I only do, when the concrete type isn’t obvious enough – but that’s like personal preference), just take a look at the next example. I just like that „keep it smart and simple“ thing, you know!?
BluetoothClient bluetoothClient = new BluetoothClient();
Dim bluetoothClient As BluetoothClient = new BluetoothClient()
Searching for devices
To start the actual search for bluetooth devices, you need to call the „DiscoverDevices“ function, of the „BluetoothClient“-instance. This will return an Array of the „BluetoothDeviceInfo“-class. Keep in mind, that this can be some kind of laggy, but we will fix this as well, soon:
var bluetoothDevices = bluetoothClient.DiscoverDevices();
Dim bluetoothDevices = bluetoothClient.DiscoverDevices()
To make it less laggy, we can actually delegate it to the „Task.Run“ helper function and use the return value of that – making it async. Keep in mind to use it in an async context, meaning like an async marked Task itself.
public async Task<BluetoothDeviceInfo[]> SearchDevicesAsync()
{
  var bluetoothClient = new BluetoothClient();
  var bluetoothDevices = await Task.Run(() => bluetoothClient.DiscoverDevices());
  bluetoothClient.Close();
  return bluetoothDevices;
}
Public Function SearchDevicesAsync() As BlutoothDeviceInfo()
  Dim bluetoothClient = New BluetoothClient()
  Dim bluetoothDevices = Await Task.Run(Function() bluetoothClient.DiscoverDevices())
  bluetoothClient.Close()
  Return bluetoothDevices
End Function
Maybe you could improve further by making use of the using statement, instead of closing the bluetooth client manually. Currently I’m elaborating on the reuse of the Bluetooth client, so maybe you can update me here as well, if you’ve found out interesting stuff!
Implementation inside a C# Winforms App
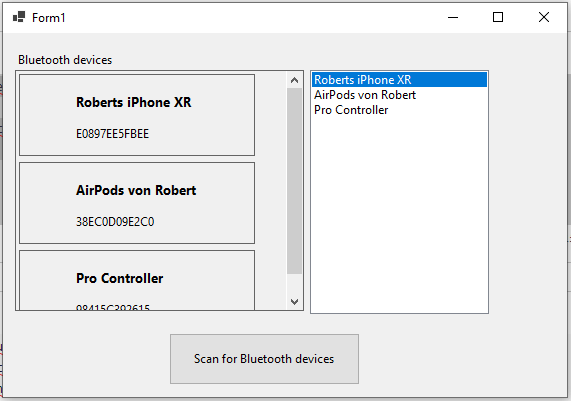
As always, I’d like to provide a nice, working and „ready to use“ example, you are welcome to download it further below. At first we will take a look at a Windows Forms application (with C#, but I mean you can easily translate the code with the above help..).
So go ahead and create a new Windows Forms App, use the NET Version 6 and install the library as explained above. If you’ve finished those steps, we can go further on creating the Windows Forms App / UI. As I personally pretty much hate laggy sh** I will of course use an asynchronous approach.
The UI
Inside this Windows Forms App considering a C# Bluetooth example, I will use two basic list variations, searching and listing our bluetooth results. One will be more or less self-implemented, the other one is a basic „ListBox“-control. Add a „FlowLayoutPanel“ with a size of like 289 x 241 and a „ListBox“ with a size of 179 x 244 to your form. Next take a button and name those controls in a nice manner as you always should.
The Code
Now we are going to add some code to our Winforms C# Bluetooth example application. At first we will create some temporary data stores for our values / class instances. Notice, that I’m using the newer filescope namespace syntax, as I love saving unnecessary spaces.
using BluetoothExampleWinformsDeviceSearchCS.Controls;
using InTheHand.Net.Sockets;

namespace BluetoothExampleWinformsDeviceSearchCS;

public partial class Form1 : Form
{

    List<BluetoothDeviceInfo> _bluetoothDevices;

    bool _isSearchingForDevices;

    public bool IsSearchingForDevices
    {
        get => _isSearchingForDevices;
        set
        {
            _isSearchingForDevices = value;
            btnScanForDevices.Enabled = !_isSearchingForDevices;
        }
    }

    // more to come..

}
Create a constructor for the form in the next step, this will initialize the device data store and configure the „ListBox“.
    public Form1()
    {
        InitializeComponent();
        _bluetoothDevices = new List<BluetoothDeviceInfo>();
        lbBluetoothDevices.DisplayMember = "DeviceName";
    }
Next, go inside the click handler of the button (with double clicking it inside the designer, or using another method) and use the following code. Keep in mind, that we are using the code already provided above, as well. At first we will set our busy flag, to indicate – well – that we are busy. Then we are clearing potential leftovers from a previous run.
After that, we are fetching our bluetooth devices and add them to our backing store all at once. If it fails for whatever reason, we will output a message containing the details. At last, we will render our UI and set the searching flag to false.
    private async void btnScanForDevices_Click(object sender, EventArgs e)
    {
        IsSearchingForDevices = true;
        _bluetoothDevices.Clear();
        flpBluetoothDevices.Controls.Clear();
        lbBluetoothDevices.Items.Clear();
        try
        {
            var bluetoothDevices = await SearchDevicesAsync();
            _bluetoothDevices.AddRange(bluetoothDevices);
        }
        catch (Exception ex)
        {
            MessageBox.Show($"Couldn't search for bluetooth devices: {ex.Message}");
        }
        if (_bluetoothDevices.Count > 0)
        {
            DisplayFlpItems();
            DisplayLbItems();
        }
        IsSearchingForDevices = false;
    }
Both methods caring about the UI lists look like this. I also added the little handler function which gets connected dynamically. Don’t forget to kill those handler when closing the form, I’m doing this in the last method.
    private void DisplayFlpItems()
    {
        foreach (var device in _bluetoothDevices)
        {
            var bluetoothDeviceItem = new BluetoothDeviceItem(device);
            bluetoothDeviceItem.Click += BluetoothDeviceItem_Click;
            flpBluetoothDevices.Controls.Add(bluetoothDeviceItem);
        }
    }

    private void BluetoothDeviceItem_Click(object? sender, EventArgs e)
    {
        var deviceItem = sender as BluetoothDeviceItem;
        var device = deviceItem!.Device;
        MessageBox.Show($"You clicked on device: {device!.DeviceName}");
    }

    private void DisplayLbItems()
    {
        lbBluetoothDevices.DataSource = null;
        lbBluetoothDevices.DataSource = _bluetoothDevices;
    }

    private void Form1_FormClosing(object sender, FormClosingEventArgs e)
    {
        if (flpBluetoothDevices.Controls.Count > 0)
        {
            foreach (var bluetoothDeviceItem in flpBluetoothDevices.Controls.OfType<BluetoothDeviceItem>())
            {
                bluetoothDeviceItem.Click -= BluetoothDeviceItem_Click;
            }
        }
    }
Last step – our little custom UserControl
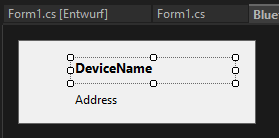
To improve the visualization of the items a bit (well, in terms of Winforms..), I created a small „UserControl“ holding some information. It will contain the name and the bluetooth address of the corresponding device. You can create a new subfolder in your project called „Controls“ and add a new „UserControl“ there. I will call it „BluetoothDeviceItem“.
Add two labels, style them in your favour and don’t forget to change the „AutoSize“ property to „false“, with an explicit width. You can avoid overflowing the control this way. The control could look like this for example:
Implementation inside a C# WPF MVVM App
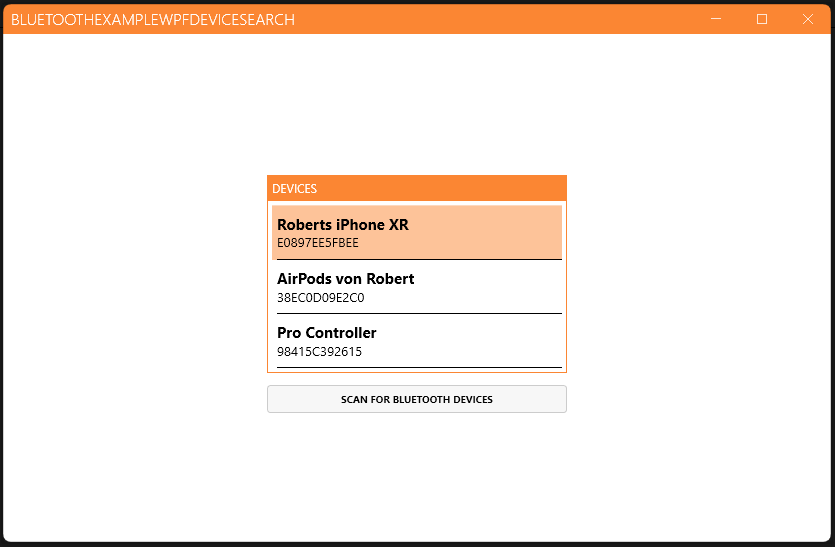
Next we will take a look on how this could look inside a more modern WPF MVVM App. Even though MVVM being a personal preference, you should be able to easily switch out necessary components. Another thing would be, that I will actually use some of my favourite WPF Tools for the app, so skip what you don’t want / need out of those 🤷♂️.
For sure, we will also use the async approach here as well, cause we don’t want laggs here as well. But first, start a new project over here as well. Pick the WPF App Visual Studio template and choose NET 6 as well. Now we will do the basic MVVM setup stuff, where I won’t go into too much detail – I will cover this in detail in a future post.
The WPF UI
Go ahead and install my favourite WPF NuGet helper libraries:
- Autofac – Managing dependency injections, IoC, etc.
- Caliburn.Micro – Easier WPF work by naming conventions
- MahApps.Metro – One of my favourite Design Toolkits
- PropertyChanged.Fody – Get rid of annoying NotifyPropertyChanged implementations
After you’ve installed the recommended libraries (or prefer to go without them), continue with installing the most important package. I’m talking about the used bluetooth lib from above.
Then create the basic MVVM folders (if used) inside your project folder like this:
- Converters
- ViewModels
- Views
Necessary imports inside App.xaml
After that we can continue by importing the necessary styles and other things inside the „App.xaml“ file. As we are not using the default boot-process in my case, take care of that removed Start-Uri thingy from at the top.
<Application x:Class="BluetoothExampleWpfDeviceSearch.App"
             xmlns="http://schemas.microsoft.com/winfx/2006/xaml/presentation"
             xmlns:x="http://schemas.microsoft.com/winfx/2006/xaml"
             xmlns:local="clr-namespace:BluetoothExampleWpfDeviceSearch"
             xmlns:mah="http://metro.mahapps.com/winfx/xaml/controls"
             xmlns:c="clr-namespace:BluetoothExampleWpfDeviceSearch.Converters">
    <Application.Resources>
        <ResourceDictionary>
            <ResourceDictionary.MergedDictionaries>
                <ResourceDictionary>
                    <local:Bootstrapper x:Key="bootstrapper" />
                    <c:RectConverter x:Key="RectConverter" />
                </ResourceDictionary>
                <ResourceDictionary>
                    <ResourceDictionary.MergedDictionaries>
                        <!-- MahApps.Metro resource dictionaries. Make sure that all file names are Case Sensitive! -->
                        <ResourceDictionary Source="pack://application:,,,/MahApps.Metro;component/Styles/Controls.xaml" />
                        <ResourceDictionary Source="pack://application:,,,/MahApps.Metro;component/Styles/Fonts.xaml" />
                        <!-- Theme setting -->
                        <ResourceDictionary Source="pack://application:,,,/MahApps.Metro;component/Styles/Themes/Light.Orange.xaml" />
                    </ResourceDictionary.MergedDictionaries>
                </ResourceDictionary>
            </ResourceDictionary.MergedDictionaries>
        </ResourceDictionary>
    </Application.Resources>
</Application>
Bootstrapping the App
Next we will create 2 classes being able to actually bootstrap our app. The first one is the base, which provides essential base functionality. Don’t worry if you don’t understand everything there, just read it carefully and learn step by step – for this example just take this note: It’s a generic bootstrapping base for our app.
using System.Linq;
using Autofac;
using Caliburn.Micro;
using System;
using System.Collections.Generic;
using System.ComponentModel;
using System.Windows;
using IContainer = Autofac.IContainer;
using BluetoothExampleWpfDeviceSearch.ViewModels;

namespace BluetoothExampleWpfDeviceSearch;

public abstract class TypedAutofacBootstrapper<TRootViewModel> : BootstrapperBase
{
    public static IContainer? Container { get; private set; }

    protected IEventAggregator? _eventAggregator { get; private set; }

    public TypedAutofacBootstrapper()
    {
        Initialize();
    }

    #region Overrides
    protected override void Configure()
    {
        var builder = new ContainerBuilder();

        RegisterBasicUtilities(builder);
        RegisterViewModels(builder);
        RegisterViews(builder);

        ConfigureContainer(builder);

        Container = builder.Build();
    }

    protected void RegisterBasicUtilities(ContainerBuilder builder)
    {
        builder.RegisterType<WindowManager>()
            .As<IWindowManager>()
            .SingleInstance();

        _eventAggregator = new EventAggregator();
        builder.RegisterInstance(_eventAggregator)
            .As<IEventAggregator>()
            .SingleInstance();
    }

    protected static Func<Type, bool> mustEndWithViewModelButNotShellViewModel = type => type.Name.EndsWith("ViewModel") && type.Name != "ShellViewModel";
    protected static Func<Type, bool> mustBeInNamespaceEndingOnViewModels = type => !string.IsNullOrWhiteSpace(type.Namespace) && type.Namespace.EndsWith("ViewModels");
    protected static Func<Type, bool> mustImplementPropertyChanged = type => type.GetInterface(nameof(INotifyPropertyChanged)) != null;

    protected void RegisterViewModels(ContainerBuilder builder)
    {
        var assembly = AssemblySource.Instance;
        builder.RegisterAssemblyTypes(assembly.ToArray())
          .Where(type => type.Name == nameof(ShellViewModel))
          .AsSelf()
          .SingleInstance();
        //.PropertiesAutowired();
        builder.RegisterAssemblyTypes(assembly.ToArray())
          .Where(mustEndWithViewModelButNotShellViewModel)
          .Where(mustBeInNamespaceEndingOnViewModels)
          .Where(mustImplementPropertyChanged)
          .AsSelf()
          .InstancePerDependency();
        //.PropertiesAutowired();
    }

    protected static Func<Type, bool> mustEndWithView = type => type.Name.EndsWith("View");
    protected static Func<Type, bool> mustBeInNamespaceEndingOnViews = type => !string.IsNullOrWhiteSpace(type.Namespace) && type.Namespace.EndsWith("Views");

    protected void RegisterViews(ContainerBuilder builder)
    {
        var assembly = AssemblySource.Instance;
        builder.RegisterAssemblyTypes(assembly.ToArray())
          .Where(mustEndWithView)
          .Where(mustBeInNamespaceEndingOnViews)
          .AsSelf()
          .InstancePerDependency()
          .PropertiesAutowired();
    }

    protected override object GetInstance(Type serviceType, string key)
    {
        if (string.IsNullOrWhiteSpace(key))
        {
            if (Container.IsRegistered(serviceType))
                return Container.Resolve(serviceType);
        }
        else
        {
            if (Container.IsRegisteredWithKey(key, serviceType))
                return Container.ResolveKeyed(key, serviceType);
        }
        throw new Exception($"Could not locate any instances of contract {key ?? serviceType.Name}.");
    }

    protected override IEnumerable<object> GetAllInstances(Type serviceType)
    {
        var ienumerableType = typeof(IEnumerable<>);
        var genericServiceEnumerableType = ienumerableType.MakeGenericType(serviceType);
        return Container.Resolve(genericServiceEnumerableType) as IEnumerable<object>;
    }

    protected override void BuildUp(object instance)
    {
        // Debug.WriteLine("BuildUp");
        Container.InjectProperties(instance);
    }
    #endregion

    protected override async void OnStartup(object sender, StartupEventArgs e)
    {
        base.OnStartup(sender, e);
        await DisplayRootViewForAsync<TRootViewModel>();
        ApplicationStarted();
    }

    protected abstract void ApplicationStarted();

    protected abstract void ConfigureContainer(ContainerBuilder builder);
}
Now we will create the actual implementation of the previous class – our app specific bootstrapper. The you will see, that this class it’s much less code. It will just start the App window (which comes next) and provides the (base) „ShellViewModel“ instance.
using Autofac;
using Caliburn.Micro;
using BluetoothExampleWpfDeviceSearch.ViewModels;
using System.Linq;
using IContainer = Autofac.IContainer;

namespace BluetoothExampleWpfDeviceSearch;

public class Bootstrapper : TypedAutofacBootstrapper<ShellViewModel>
{

    protected override void ConfigureContainer(ContainerBuilder builder)
    {
        // register more stuff specific to your app
    }

    protected override void ApplicationStarted()
    {

    }

}
Creating the ShellViewModel
The „ShellViewModel“ is the basic shell around our app, you could say, it’s the „window“. Go ahead and create it inside the „ViewModels“ folder. In modern applications, there are likely less windows being used. You basically switch out sub-views of the main app and only use windows if appropriate. So right now we’re only saying: When the app is started, show our start screen, which is basically a „CallViewModel“. Sorry for the name, took it out of the old project.
using Autofac;
using Caliburn.Micro;

namespace BluetoothExampleWpfDeviceSearch.ViewModels;

public class ShellViewModel : Conductor<IScreen>.Collection.OneActive
{

    public ShellViewModel()
    {
        ShowStartScreen();
    }

    private async void ShowStartScreen()
    {
        var callViewModel = Bootstrapper.Container.Resolve<CallViewModel>();
        await ActivateItemAsync(callViewModel);
    }
}
Now we need the corresponding view as well, the „ShellView“, which should be created inside the „Views“ folder (you may delete the MainWindow file previously!). I won’t go into Caliburn Micro, etc. here, because the post maybe is long enough right now haha. Basically we’re showing the current view (which is called ActiveItem) by naming convention based databinding.
<mah:MetroWindow x:Class="BluetoothExampleWpfDeviceSearch.Views.ShellView"
        xmlns="http://schemas.microsoft.com/winfx/2006/xaml/presentation"
        xmlns:x="http://schemas.microsoft.com/winfx/2006/xaml"
        xmlns:d="http://schemas.microsoft.com/expression/blend/2008"
        xmlns:mc="http://schemas.openxmlformats.org/markup-compatibility/2006"
        xmlns:mah="http://metro.mahapps.com/winfx/xaml/controls"
        mc:Ignorable="d"
        d:DesignWidth="1366"
        d:DesignHeight="720"
        Title="BluetoothExampleWpfDeviceSearch" BorderThickness="0" GlowBrush="Black" AllowsTransparency="True" Name="TheWindow" IsWindowDraggable="True" SizeToContent="WidthAndHeight" WindowStartupLocation="CenterScreen">

    <mah:MetroWindow.Clip>
        <RectangleGeometry RadiusX="8" RadiusY="8">
            <RectangleGeometry.Rect>
                <MultiBinding Converter="{StaticResource RectConverter}">
                    <Binding ElementName="TheWindow" Path="ActualWidth"/>
                    <Binding ElementName="TheWindow" Path="ActualHeight"/>
                </MultiBinding>
            </RectangleGeometry.Rect>
        </RectangleGeometry>
    </mah:MetroWindow.Clip>

    <mah:TransitioningContentControl Name="ActiveItem" />

</mah:MetroWindow>
The list page ViewModel
In this step, we will create the actual view for listing our devices. Create a new viewmodel called „CallViewModel“ (or correct it and directly name it BluetoothDeviceListViewModel).
We basically have a storage list, where we keep our found devices – notice the „BindableCollection“ type. This type comes from „Caliburn.Micro“ and helps us – seeing the name – with binding to a collection. Maybe a separate post will be coming for this, too, for now it’s enough to know.
Then we are keeping track of which device is actually selected with the „SelectedDevice“ property. And we are also remembering, if we are currently busy searching for devices. This will ensure, that the button isn’t usable, if we are already searching.
using Caliburn.Micro;
using InTheHand.Net.Bluetooth;
using InTheHand.Net.Sockets;
using System;
using System.Collections.Generic;
using System.Diagnostics;
using System.Linq;
using System.Text;
using System.Threading.Tasks;

namespace BluetoothExampleWpfDeviceSearch.ViewModels;

public class CallViewModel : Screen
{

    public BindableCollection<DeviceItemViewModel> Devices { get; set; }

    public DeviceItemViewModel? SelectedDevice { get; set; }

    public bool IsSearchingDevices { get; set; }

    public CallViewModel()
    {
        Devices = new();
        IsSearchingDevices = false;
    }

    public async Task SearchDevices()
    {
        IsSearchingDevices = true;
        Devices.Clear();
        var client = new BluetoothClient();
        var devices = new List<BluetoothDeviceInfo>();
        try
        {
            devices.AddRange((await Task.Run(() => client.DiscoverDevices())).ToList());
        }
        catch (Exception ex)
        {
            Debug.WriteLine(ex.Message);
        }
        finally
        {
            Devices.AddRange(devices.Select(x => new DeviceItemViewModel(x)));
            client.Close();
            IsSearchingDevices = false;
        }
    }

    public bool CanSearchDevices => !IsSearchingDevices;

}
The list page View
Now add another UserControl inside the Views folder and call it „CallView“ (or use the corrected version like BluetoothDeviceListView). Here we are also using some of caliburns helper conventions. I’m just telling the „ListBox“: „Hey, your name is ‚Devices‘, so, bind to those“ – and it just works.
Then i’m defining a template for the items to be displayed. This could also be a separate file and the line I’ve commented out. Like this, caliburn would automatically look for a file fitting the naming style „DeviceItemViewModel“ -> „DeviceItemView“ whose ViewModel we are going to create now.
<UserControl x:Class="BluetoothExampleWpfDeviceSearch.Views.CallView"
             xmlns="http://schemas.microsoft.com/winfx/2006/xaml/presentation"
             xmlns:x="http://schemas.microsoft.com/winfx/2006/xaml"
             xmlns:mc="http://schemas.openxmlformats.org/markup-compatibility/2006"
             xmlns:d="http://schemas.microsoft.com/expression/blend/2008"
             xmlns:local="clr-namespace:BluetoothExampleWpfDeviceSearch.Views"
             mc:Ignorable="d"
             Height="380" Width="700" Margin="64">
    <Grid>
        <StackPanel Width="300" HorizontalAlignment="Center" VerticalAlignment="Center">
            <GroupBox Header="Devices" Margin="0 12" MinHeight="150">
                <!-- Using default template-->
                <!--<ListBox Name="Devices" />-->

                <!-- Using custom template (without caliburn convention..) -->
                <ListBox Name="Devices">
                    <ListBox.ItemTemplate>
                        <DataTemplate>
                            <StackPanel>
                                <TextBlock Text="{Binding Device.DeviceName}" FontSize="15" FontWeight="Bold" Margin="0 8 0 0" />
                                <TextBlock Text="{Binding Device.DeviceAddress}" FontSize="13" Margin="0 0 0 8" />
                                <Border BorderThickness="0 1 0 0" BorderBrush="Black" />
                            </StackPanel>
                        </DataTemplate>
                    </ListBox.ItemTemplate>
                </ListBox>
            </GroupBox>
            <Button Name="SearchDevices" Content="Scan for Bluetooth devices" />
        </StackPanel>
    </Grid>
</UserControl>
The device item ViewModel – the last step
In the last step, we will create a simple ViewModel to hold the device for us:
using Caliburn.Micro;
using InTheHand.Net.Sockets;

namespace BluetoothExampleWpfDeviceSearch.ViewModels;

public class DeviceItemViewModel : PropertyChangedBase
{

    public BluetoothDeviceInfo Device { get; }

    public DeviceItemViewModel(BluetoothDeviceInfo device)
    {
        Device = device;
    }

}
Conclusion – C# Bluetooth example
So in todays post we learned how to use the 32feet bluetooth library, to list / search for bluetooth devices. We covered a complete Windows Forms example and also a WPF MVVM app example of implementing the explained functionality. I hope this will get your bluetooth aware app on fire – cheers!
