rskibbe.Validation – Validating .NET objects and values – but easy!

Inhaltsverzeichnis
- 1 What is rskibbe.Validation?
- 2 Using it – in short
- 3 How to use – in general?
- 4 Quick example
- 4.1 Step 1 – Install the package(s)
- 4.2 Step 2 – Import the corresponding namespace (s)
- 4.3 Step 3 – Get a new validator class instance
- 4.4 Step 3.1 – Specifying a TemplatePack
- 4.5 Autodetecting a Template Pack
- 4.6 Step 4 – Configure the validation rules
- 4.7 Step 5 – Checking the result
- 4.8 Complete quick example
- 5 A typical Windows Forms example
- 6 Avoiding / minimizing duplicate configurations
- 7 Specifying custom messages / templates
- 8 Displaying / formatting the result
- 9 Conditional checks
- 10 Creating custom constraints
- 11 Translating the messages
- 12 Downloads
What is rskibbe.Validation?
rskibbe.Validation is a free NuGet package for C# and Visual Basic .NET apps, helping you validate „things“ and providing an easy to use and fluent interface. Basic things like „MaxLength“, „MinLength“, „NotNull“, etc. will help you validate your input. If you want even more functionality without creating things yourself, you can install the sub packages as well.
Using it – in short
- Install the package
- Import namespaces
- Instantiate a new Validator
- Provide / Autodetect a TemplatePack implementation
- Load the TemplatePack where appropriate (like Form Load and such alike)
- Configure validation constraints / rules
- Call validate where appropriate (like in a submit button)
- Display the errors / handle success
How to use – in general?
Before we start using the rskibbe.Validation package itself, we will first talk about its core concepts. As already explained it will help you validating your forms / inputs. To do so, we will use the provided „Validator“ class.
Validator responsibility
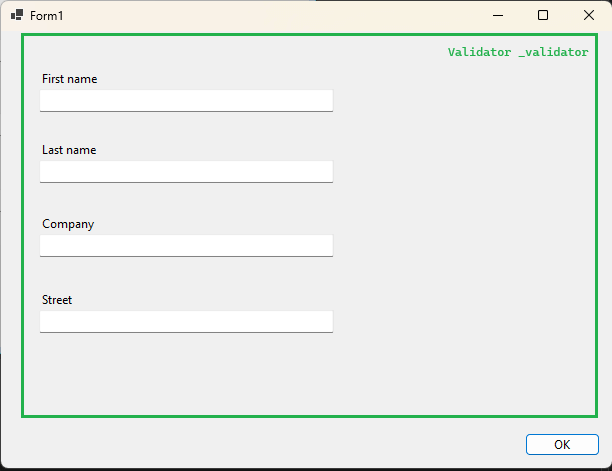
One validator mostly has the responsibility for one entire formular, as you can see in the following image. You would typically create a private / protected field in the background / inside the form class and instantiate / configure it during form construction.
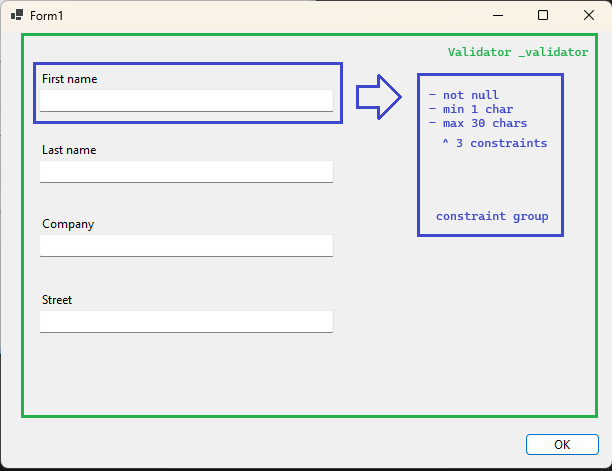
Constraint groups – the field specific rules
The Validator is pretty much useless, if you don’t tell „him“ what to do. So you need to configure some sort of „per field“ rules. Usually you could say something like: „The first name field shouldn’t be null, nor longer than 30 characters. But I also want that field to be required – having at least one character inside“. This is called a constraint group with different constraints.
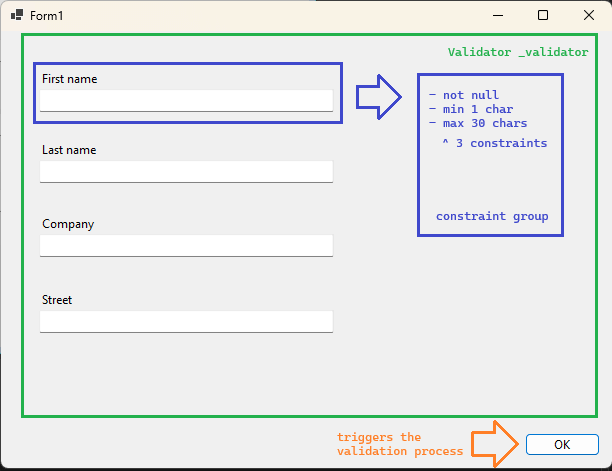
The validation process itself
After creating the validator and the field specific rules itself, we can now talk about triggering the validation process. This is usually done by some sort of confirmation button, which will then create / update something in the database – whether it be through a repository, or not…
When pressing the button, call the validators „Validate“ method and it will iterate through each group and constraint specified. You can then check the return value of type „IValidationResult“ which contains information like „IsInvalid“ / „IsValid“ and the specific errors.
TemplatePacks
Version 1.1.1 introduced something called „TemplatePacks“. So far, the library provided you with basic messages like „shouldn’t be empty“ when (for example) using the „NotNull“ validation constraint. As assuming that everyone’s only using the english language would be pretty arrogant, I could’ve provided you with like every language – but this would be terrible as well. Even if it would be only a few strings for each language, this didn’t feel right – especially, when you have like 7100 spoken languages in the world.
That being said, I removed the default message template strings from the Extension methods like „NotNull“, „Length“, etc. and introduced the „TemplatePacks“. Just define your validator as usual and make sure to provide an „ITemplatePack“ implementation with the „UseTemplatePack“. In like the Form-Load code (or wherever suited), you could then load the contents of the „TemplatePack“. If you need more information, look at the more detailed section or examples.
Quick example

Let’s get started with the most basic example, to validate your objects and values in a .NET app. Feel free to scroll down, to get details about more complex scenarios.
Step 1 – Install the package(s)
Open the NuGet Package Manager and execute the following commands (or install it by GUI). We will prepare our app to use the most simple validation functionality – nothing special (which is shown further down):
Install-Package rskibbe.Validation
Step 2 – Import the corresponding namespace (s)
Depending on your custom setup, you need to choose the corresponding namespaces, which will enable using the provided classes and interfaces. This example will just use the easiest way possible:
using rskibbe.Validation.Models;
using rskibbe.Validation.Contracts;
Imports rskibbe.Validation.Models
Imports rskibbe.Validation.Contracts
Step 3 – Get a new validator class instance
To make use of a validator, you for sure need to create one, right!? Go ahead and create a validator like in one of these examples. I personally prefer the more visually chainable „Validator.New“ syntax:
// using the static factory property
// some prefer this for chaining
Validator.New

// using the usual way
new Validator()
' using the shared factory property
' some prefer this for chaining
Validator.New

' using the usual way
New Validator()
Step 3.1 – Specifying a TemplatePack
As mentioned in the Template Pack introduction above, since version 1.1.1 you need to provide a template pack implementation to avoid (either / or):
- having to download every possible language
- overriding each message template for each constraint / validator
- only using the english language
You basically can either provide a „template pack“ with the use of the „UseTemplatePack“ method per instance, or you could for example use the static „GlobalTemplatePack“ property to provide a template pack at application startup. Each subsequently created validator will then use that template pack – when using the global method. Don’t forget to call „LoadTemplatePackAsync“ when suited – like in the „Form Load“ eventhandler. The validator will otherwise try to load the provided template pack when validating (which will slow down performance, etc.).
// provide an existing / prepared Template Pack
Validator
    .New
    .UseTemplatePack(myTemplatePack);
' provide an existing / prepared Template Pack
Validator _
    .New _
    .UseTemplatePack(myTemplatePack)
Autodetecting a Template Pack
Next to specifying a template pack manually, you can let the validator try to autodetect it. It will scan the executing assembly for an implementation of „ITemplatePack“. Keep an eye on the „iso“ parameter, which will allow you to pass something like „CultureInfo.CurrentUICulture.Name“ to get the current system language. The autodetect feature will then look for an implementation in the executing assembly like this:
// will autodetect an implementation
// you could also pass 'CultureInfo.CurrentUICulture.Name'
// to check for a specific language iso like "de-DE"
Validator
    .New
    .AutoDetectTemplatePack();
' will autodetect an implementation
' you could also pass 'CultureInfo.CurrentUICulture.Name'
' to check for a specific language iso like "de-DE"
Validator _
    .New _
    .AutoDetectTemplatePack()
Step 4 – Configure the validation rules
After having a validator, we now need to tell „him“ which values we want to be validated and which rules need to be applied to each of these values. Keep in mind that there will be scenarios where you will already have your values, but there will be other situations as well. Like when the user enters something in your UI and after pressing the „add“, „save“, „confirm“ button, you will only know the values at that exact moment.
That means, configuration and validation can (and will mostly) be 2 separated steps. In the easiest example, we will do both at once – this means no real „lazy“ evaluation of those values. If you want another example on this, you can take a look at the Windows Forms Example.
Checking one value with one or multiple rules
Let’s now define one value which should be validated with 2 typical rules like „shouldn’t be null and needs to be at least 1 character long, but not longer than 30 characters“. This is just for displaying purposes as you will mostly have more than one value to be checked – see the next example for this:
string myVarToCheck = "Robert";
Validator
    .New
    .For(myVarToCheck, "first name")
    .NotNull()
    .LengthBetween(1, 30);
Dim myVarToCheck = "Robert"
Validator _
    .New _
    .For(myVarToCheck, "first name") _
    .NotNull() _
    .LengthBetween(1, 30)
Checking multiple values with corresponding rules
Now we will take a look what like checking a first and a last name (or more…) would look like. As you will see in a few seconds, you can easily chain multiple „For’s“ creating more than one so called „ConstraintGroup“. So, the validator basically has one or multiple „constraint groups“ where each group will target checking the corresponding values.
string firstName = "Robert";
string lastName = "Skibbe";
Validator
    .New
    // the first "field" to validate
    .For(firstName, "first name")
    .NotNull()
    .LengthBetween(1, 30)
    // adding more
    .For(lastName, "last Name")
    .NotNull()
    .LengthBetween(1, 30);
Dim firstName = "Robert"
Dim lastName = "Skibbe"
Validator _
    .New _
    ' the first "field" to validate
    .For(firstName, "first name") _
    .NotNull() _
    .LengthBetween(1, 30)
    ' adding more
    .For(lastName, "last name") _
    .NotNull() _
    .LengthBetween(1, 30)
Step 5 – Checking the result
After we’ve finished the configuration and validation process, we can know take a look at the result. You can get the result of your configured constraint groups and provided values by calling „Validate“ on the validator instance.
You can then check the results according properties like for example „IsInvalid“:
IValidationResult result = Validator
    .New
    // your rules and configurations
    .Validate();

if (result.IsInvalid)
{
    // do something..
    // early return;
}

// everything worked..
// save to db, etc.
Dim result As IValidationResult = Validator _
    .New _
    ' your rules and configurations
    .Validate()

If result.IsInvalid Then
    ' do something..
    ' early return
End If

' everything worked
' save to db, etc.
Complete quick example
Here you can find the complete quick example from the separated parts from above:
string firstName = "Robert";
string lastName = "Skibbe";
IValidationResult result = Validator
    .New
    // the first "field" to validate
    .For(firstName, "first name")
    .NotNull()
    .LengthBetween(1, 30)
    // adding more
    .For(lastName, "last Name")
    .NotNull()
    .LengthBetween(1, 30)
    .Validate();

if (result.IsInvalid)
{
    // do something..
    // early return;
}

// everything worked..
// save to db, etc.
Dim firstName = "Robert"
Dim lastName = "Skibbe"
Dim result As IValidationResult = Validator _
    .New _
    ' the first "field" to validate
    .For(firstName, "first name") _
    .NotNull() _
    .LengthBetween(1, 30)
    ' adding more
    .For(lastName, "last name") _
    .NotNull() _
    .LengthBetween(1, 30)
    .Validate()

If result.IsInvalid Then
    ' do something..
    ' early return
End If

' everything worked
' save to db, etc.
A typical Windows Forms example
After I showed you the quick example from above where we just combined configuration and validation in one step, we will now go further. In a real life scenario you would have like a UI where the user inputs some values, but this will happen at a point in time, where you already made your „validation configuration“. Getting the values to be validated will therefore be happening delayed / deferred.
Creating a simple form
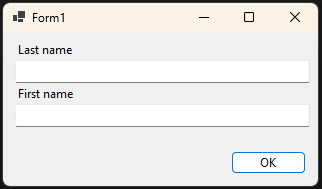
You can now go ahead and create a simple windows forms application from scratch. We will stay with the created „Form1“ which should like the following. I just added 2 example input fields representing typical first and lastname fields like the ones from above.
You will then have this typical „confirm“ button, which should add or update the dataset in like the database. For sure, this should only happen, when everything is okay – or validated:
Configuring the rules for our fields
We will now create the basic configuration for our form fields. The configuration should happen and „stay alive“ as long as it’s needed. I would personally say, that this is the fact, as long as the form itself exists. During the existence of the form, the user could trigger the „ok“ multiple times, so we can’t only rely on one validation process.
Please create a configuration like the following – I will use the forms constructor for that. There will be 2 validation groups (one for each field) and 2 constraints / rules for each field.
public Form1()
{
    InitializeComponent();
    Validator
        .New
        // create a new constraint group
        .For(() => tbFirstName.Text, "first name")
        // with two constraints
        .NotNull()
        .LengthBetween(1, 30)
        // another group
        .For(() => tbLastName.Text, "last name")
        // with the same constraints
        .NotNull()
        .LengthBetween(1, 30);
}
Sub New()
    InitializeComponent()
    Validator _
        .New _
        ' create a new constraint group
        .For(Function() tbFirstName.Text, "first name") _
        ' with two constraints
        .NotNull() _
        .LengthBetween(1, 30) _
        ' another group
        .For(Function() tbLastName.Text, "last name") _
        ' with the same constraints
        .NotNull() _
        .LengthBetween(1, 30)
End Sub
Storing the validator for later usage
Even though we now successfully configured our validator and the corresponding fields, we are not done yet. The main problem right now would be, that we can’t access the readily configured validator to actually trigger the validation process. The validation process needs to be triggered somewhere totally else – in the code of the confirmation button. To do so, we would need access to the configured instance there.
You can easily store the configured instance of the validator by just accessing the readonly „Validator“ property of one of the constraint groups. Do this after you’ve configured your validator:
// don't forget to import the namespaces

protected IValidator _validator;

public Form1()
{
    InitializeComponent();
    _validator = Validator
        .New
        // constraints config code
        // from the previous code example
        .Validator;
}
' don't forget to import the namespaces

Protected _validator As IValidator

Sub New()
    InitializeComponent();
    _validator = Validator _
        .New _
        ' constraints config code
        ' from the previous code example
        .Validator
End Sub
Checking the results on confirmation
After configuring everything and after the user has (potentially) entered something in our input fields, we can now check the results. As already mentioned, this will happen inside the „button click handler“-code. This could look like the following code snippet:
// don't forget to import the namespaces

// previous code

private void btnOk_Click(object sender, EventArgs e)
{
    IValidationResult result = _validator.Validate();
    if (result.IsInvalid)
    {
        // display something from "result"
        MessageBox.Show("Please check the input fields!");
        // early return
        return;
    }

    // create, update something in like the database
}
' don't forget to import the namespaces

' previous code

Private Sub btnOk_Click(sender As Object, e As EventArgs) Handles btnOk.Click
    Dim result As IValidationResult = _validator.Validate()

    If result.IsInvalid Then
        ' display something from "result"
        MessageBox.Show("Please check the input fields!")
        ' early return
        Return
    End If

    ' create, update something in like the database
End Sub
The complete Winforms example
If you followed the guide so far, but had problems implementing the single parts, you can easily integrate this into your app. Further down, you will find the download as well – which makes it even easier.
using rskibbe.Validation.Contracts;
using rskibbe.Validation.Models;

namespace ExampleGui;

public partial class Form1 : Form
{

    protected IValidator _validator;

    public Form1()
    {
        InitializeComponent();
        _validator = Validator
            .New
            // create a new constraint group
            .For(() => tbFirstName.Text, "first name")
            // with two constraints
            .NotNull()
            .LengthBetween(1, 30)
            // another group
            .For(() => tbLastName.Text, "last name")
            // with the same constraints
            .NotNull()
            .LengthBetween(1, 30)
            .Validator;
    }

    private void btnOk_Click(object sender, EventArgs e)
    {
        IValidationResult result = _validator.Validate();
        if (result.IsInvalid)
        {
            // display something from "result"
            MessageBox.Show("Please check the input fields!");
            // early return
            return;
        }

        // create, update something in like the database
    }

}
Imports rskibbe.Validation.Contracts
Imports rskibbe.Validation.Models

Namespace ExampleGui

    Public Partial Class Form1
        Inherits Form

        Protected _validator As IValidator

        Public Sub New()
            InitializeComponent()
            _validator = Validator _
                .New _
                .For(Function() tbFirstName.Text, "first name") _
                .NotNull() _
                .LengthBetween(1, 30) _
                .For(Function() tbLastName.Text, "last name") _
                .NotNull() _
                .LengthBetween(1, 30) _
                .Validator
        End Sub

        Private Sub btnOk_Click(sender As Object, e As EventArgs)
            Dim result As IValidationResult = _validator.Validate()

            If result.IsInvalid Then
                ' display something from "result"
                MessageBox.Show("Please check the input fields!")
                ' early return
                Return
            End If

            ' create, update something in like the database
        End Sub

    End Class

End Namespace
Avoiding / minimizing duplicate configurations
When thinking about creating different validation configurations, it’s common to have similar setups. Think for example about the following configuration which is pretty annoying. You need to duplicate the same stuff like 3 or more times:
Validator
    .New
    // field 1
    .For(() => tbFirstName.Text, "first name")
    .NotNull()
    .LengthBetween(1, 30)
    // same for field 2
    .For(() => tbMiddleName.Text, "middle name")
    .NotNull()
    .LengthBetween(1, 30)
    // same for field 3 - and so on...
    .For(() => tbLastName.Text, "last name")
    .NotNull()
    .LengthBetween(1, 30);
Validator _
    .New _
    ' field 1
    .For(Function() tbFirstName.Text, "first name") _
    .NotNull() _
    .LengthBetween(1, 30) _
    ' same for field 2
    .For(Function() tbMiddleName.Text, "middle name") _
    .NotNull() _
    .LengthBetween(1, 30) _
    ' same for field 3
    .For(Function() tbLastName.Text, "last name") _
    .NotNull() _
    .LengthBetween(1, 30)
To avoid repetitive code like the one displayed above, you can just use the „SameFor“ method on the chain. This way, you can define your configuration for one field and reuse the same config (or build upon) for other fields like the „middle name“ or „last name“ in this case.
Duplicating the last entry
With the following example, it will always duplicate the last configured entry. So the first call (in the next example) to „SameFor“ will duplicate the recent config of „first name“ and the second call to „SameFor“ will duplicate the config for the „middle name“ config. Keep reading the next section, to get an idea on how to duplicate the config from – not – the last one.
Validator
    .New
    .For(() => tbFirstName.Text, "first name")
    .NotNull()
    .LengthBetween(1, 30)
    .SameFor(() => tbMiddleName.Text, "middle name")
    .SameFor(() => tbLastName.Text, "last name");
Validator _
    .New _
    .For(Function() tbFirstName.Text, "first name") _
    .NotNull() _
    .LengthBetween(1, 30) _
    .SameFor(Function() => tbMiddleName.Text, "middle name") _
    .SameFor(Function() => tbLastName.Text, "last name")
Duplicating / extending from a specific config
Without specifying the „sourceKey“ parameter, it will automatically duplicate the most recent constraint group – with the new key. If you specify this parameter, you can pull a config from further above – not only the most recent one. This allows you to create more complex scenarios and won’t restrict you to always go for the latest config entry. Take a look at the following example:
Validator
    .New
    .For(() => tbFirstName.Text, "first name")
    .NotNull()
    .LengthBetween(1, 30)
    .SameFor(() => tbMiddleName.Text, "middle name")
    // I won't pull from middle name, I will pull from further up, "first name"
    .SameFor(() => tbLastName.Text, "last name", "first name");
Validator _
    .New _
    .For(Function() tbFirstName.Text, "first name") _
    .NotNull() _
    .LengthBetween(1, 30) _
    .SameFor(Function() => tbMiddleName.Text, "middle name") _
    ' I won't pull from middle name, I will pull from further up, "first name" _
    .SameFor(Function() => tbLastName.Text, "last name", "first name")
Specifying custom messages / templates

Starting with version 1.0.3 you can specify templates while configuring your constraints using the according methods. For the most templates you will need to specify the available placeholders – like the „max“ parameter considering the „MaxLength“ constraint method.
Default look
You can easily provide your custom messages / templates like in the following. Take a look how it would look by default – first:
// other code from the validator chain..
.LengthBetween(1, 30)
// other code from the validator chain..
' other code from the validator chain..
.LengthBetween(1, 30)
' other code from the validator chain..
The result:
Adjusting the template
Let’s now adjust that template you’ve seen above:
// other code from the validator chain..
.LengthBetween(1, 30, "at least {min} but not more than {max}")
// other code from the validator chain..
' other code from the validator chain..
.LengthBetween(1, 30, "at least {min} but not more than {max}")
' other code from the validator chain..
And it will now look like this:

Displaying / formatting the result
We talked about the principles and constraints and we’ve also talked about storing the instance of the validator to – for example – use the validate method. The validate method returns a result, which we can then check upon. Here you can see a typical example on how to display some custom errors or formatting those.
Using manual formatting
private void btnOk_Click(object sender, EventArgs e)
{
// config further above!
IValidationResult result = _validator.Validate();
if (result.IsInvalid)
{
// display something from "result"
var sb = new StringBuilder();
foreach (var errorGroup in result.ErrorGroups)
{
sb.AppendLine($"{errorGroup.Key}");
foreach (var error in errorGroup.Errors)
sb.AppendLine($"- {error.Message}");
sb.AppendLine();
}
var nl = Environment.NewLine;
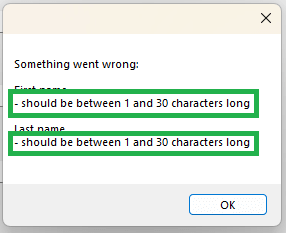
MessageBox.Show($"Something went wrong: {nl}{nl}{sb}");
// early return
return;
}
// do the insert, update, whatever
}
Private Sub btnOk_Click(sender As Object, e As EventArgs)
    ' your config further above!

    Dim result As IValidationResult = _validator.Validate()

    If result.IsInvalid Then
        Dim sb = New StringBuilder()

        For Each errorGroup In result.ErrorGroups
            sb.AppendLine($"{errorGroup.Key}")

            For Each err In errorGroup.Errors
                sb.AppendLine($"- {err.Message}")
            Next
            sb.AppendLine()
        Next

        Dim nl = Environment.NewLine
        MessageBox.Show($"Something went wrong: {nl}{nl}{sb}")
        ' early return
        Return
    End If

    ' do the insert, update, whatever
End Sub
The code from above will yield something like the following:

Using the ValidationResultFormatter class
If you don’t want to build up the string yourself, I added an example formatter class called „ValidationResultFormatter“ to construct the string from above. This way, you don’t need to manually build up from the groups and errors and you can choose where to display the message.
    private void btnOk_Click(object sender, EventArgs e)
    {
        IValidationResult result = _validator.Validate();
        if (result.IsInvalid)
        {
            // display something from "result"
            var nl = Environment.NewLine;
            var sb = new ValidationResultFormatter()
                .Format(result);
            MessageBox.Show($"Something went wrong: {nl}{nl}{sb}");
            // early return
            return;
        }

        // do the insert, update, whatever
    }
Private Sub btnOk_Click(sender As Object, e As EventArgs)
    Dim result As IValidationResult = _validator.Validate()

    If result.IsInvalid Then
        ' display something from "result"
        Dim nl = Environment.NewLine
        Dim sb = New ValidationResultFormatter().Format(result)
        MessageBox.Show($"Something went wrong: {nl}{nl}{sb}")
        ' early return
        Return
    End If

    ' do the insert, update, whatever
End Sub
Conditional checks

Sometimes you don’t want all constraints to be invoked. For example, if you have a customer input form, you could possibly want to distinguish between business and private customers. In this case you could go like this: I want the form to either be filled with a company name or first and last name – not both are required.
This could be done like this here:
// without comments
IValidator validator = Validator
    .New
    .For(() => tbFirstName.Text, "First name")
    .NotNull()
    .LengthBetween(1, 30)
    .Ignore(If.Provided(() => tbCompany.Text))
    .SameFor(() => tbLastName.Text, "Last name")
    .Ignore(If.Provided(() => tbCompany.Text))
    .SameFor(() => tbCompany.Text, "Company")
    .Ignore(If.Provided(() => tbFirstName.Text, () => tbLastName.Text))
    .Validator;

// with explanation comments
IValidator validator = Validator
    // kick off a new validator
    .New
    // create the first constraint group
    .For(() => tbFirstName.Text, "First name")
    // configure the constraints
    .NotNull()
    .LengthBetween(1, 30)
    // these previous rules for "First name" are ignored, when company is provided at evaluation
    .Ignore(If.Provided(() => tbCompany.Text))
    // copy the same constraints for "Last name" (but not the ignore rules!)
    .SameFor(() => tbLastName.Text, "Last name")
    // ignore this "last name" field as well, if company is provided at evaluation
    .Ignore(If.Provided(() => tbCompany.Text))
    // create the same basic constraints for company
    .SameFor(() => tbCompany.Text, "Company")
    // ignore company validation, if the first name and the last name is provided at evaluation
    .Ignore(If.Provided(() => tbFirstName.Text, () => tbLastName.Text))
    // get the configured validator instance
    .Validator;
' without comments
Dim validator = Validator
    .New _
    .For(Function() tbFirstName.Text, "First name") _
    .NotNull() _
    .LengthBetween(1, 30) _
    .Ignore(If.Provided(Function() tbCompany.Text)) _
    .SameFor(Function() tbLastName.Text, "Last name") _
    .Ignore(If.Provided(Function() tbCompany.Text)) _
    .SameFor(Function() tbCompany.Text, "Company") _
    .Ignore(If.Provided(Function() tbFirstName.Text, Function() tbLastName.Text)) _
    .Validator

' with explanation comments
Dim validator = Validator
    ' kick off a new validator
    .New
    ' create the first constraint group
    .For(Function() tbFirstName.Text, "First name")
    ' configure the constraints
    .NotNull()
    .LengthBetween(1, 30)
    ' these previous rules for "First name" are ignored, when company is provided at evaluation
    .Ignore(If.Provided(Function() tbCompany.Text))
    ' copy the same constraints for "Last name" (but not the ignore rules!)
    .SameFor(Function() tbLastName.Text, "Last name")
    ' ignore this "last name" field as well, if company is provided at evaluation
    .Ignore(If.Provided(Function() tbCompany.Text))
    ' create the same basic constraints for company
    .SameFor(Function() tbCompany.Text, "Company")
    ' ignore company validation, if the first name and the last name is provided at evaluation
    .Ignore(If.Provided(Function() tbFirstName.Text, Function() tbLastName.Text))
    ' get the configured validator instance
    .Validator
Creating custom constraints
There will be some scenarios where you could want to add more constraints to the existing ones. This can currently be done by just creating your two custom classes:
- one for the constraint itself
- and the other class will be the error template.
Creating a Constraint class
As mentioned, you need to create a custom constraint class first. For this, you will inherit from the „ValidationConstraint“ class and provide a constructor with a custom implementation of the „Validate“ function. The „Validate“ function is the core thing here as this will determine, if your custom validation succeeds or fails:
    public class MyConstraint : ValidationConstraint
    {

        public MyConstraint(string key, string template) : base(key, new MyValidationErrorMessageTemplate(key, template))
        {

        }

        public override bool Validate(object? value)
        {
            return false;
        }

    }
Public Class MyConstraint
    Inherits ValidationConstraint

    Public Sub New(key As String, template As String)
        MyBase.New(key, New MyValidationErrorMessageTemplate(key, template))
    End Sub

    Public Overrides Function Validate(value As Object?) As Boolean
        Return False
    End Function

End Class
Adding the error message template
After defining your own constraint class, you now need to create a corresponding error message template class. You can do so by inheriting from one of two classes:
- the ValidationErrorMessageTemplate class
- or the MyValidationErrorMessageTemplate class
As the names already suggest: One class is for templates without placeholders and the other one is used for templates with placeholders. I will show the easy example without placeholders in this case. If you want to use placeholders for your error message template, just inherit from the class mentioned above and override the abstract „SetupPlaceholders“ method to add your placeholders to the „Placeholders“ list property.
    public class MyValidationErrorMessageTemplate : ValidationErrorMessageTemplate
    {

        public MyValidationErrorMessageTemplate(string key, string template) : base(key, template)
        {

        }

    }
Public Class MyValidationErrorMessageTemplate
    Inherits ValidationErrorMessageTemplate

    Public Sub New(key As String, template As String)
        MyBase.New(key, template)
    End Sub

End Class
Adding the custom constraint
In the last step, we will add our created constraint to our „validation chain / list“. Otherwise our constraint will not be used:
Validator
    .New
    .For(() => tbFirstName.Text, "First name")
    .NotNull()
    .LengthBetween(1, 30)
    .AddConstraint(new MyConstraint("First name", "The error message"));
Validator
    .New _
    .For(Function() tbFirstName.Text, "First name") _
    .NotNull() _
    .LengthBetween(1, 30) _
    .AddConstraint(New MyConstraint("First name", "The error message"))
Translating the messages
Downloads
Reading can sometimes be pretty annoying, right? I got you covered here, you can easily download the example project of your choice. This way, you will be „ready to go“ in a few seconds and you can see my package in action. If you have problems with the NuGet packages – make sure to reinstall the needed packages. Before uploading, I remove every binary file, so that every receives a „no binary“ version to build it themselves.