The WPF ListView Control – the complete Guide in 2024

Inhaltsverzeichnis
- 1 The WPF ListView – listing items / things
- 2 What is a WPF ListView?
- 3 A first example – with XAML & code behind
- 4 Working with „real data“ – MVVM approach
- 5 Displaying bound data inside the WPF ListView
- 6 Using the ListViews „View“ Property creating columns
- 6.1 But why a ListView, why no DataGrid instead?
- 6.2 Specifying a „View“-template
- 6.3 Adding, removing, etc. the MVVM way – preparations
- 6.4 A DelegateCommand base class
- 6.5 A PropertyChangedBase class
- 6.6 Corresponding buttons
- 6.7 The MainViewModel
- 6.8 Assign a ViewModel to the MainWindow
- 6.9 How to add WPF ListView items with MVVM
- 6.10 Removing the selected item MVVM style
- 6.11 Deleting an item by index, MVVM like
- 7 Summing up
- 8 Downloads
The WPF ListView – listing items / things
In today’s post, we are going to talk about one of the most basic controls: The WPF ListView. We will take a look at the different use cases of the ListView and we will try out some of the architectural styles. As MVVM is like the „way to go“ in WPF, I will definitely examine this, but we won’t forget the „old way“. Like always, I will provide different source code examples in the two most used .NET languages, being C# and VB.NET.
What is a WPF ListView?
When stumbling upon this control, the first question coming to your mind could be: „Well, what is a ListView – in the Windows Presentation Foundation – in the first place?“. I mean, by the name, you could just assume, that it’s something for displaying like a „list“ of something, right? I mean, you are pretty much on the right side, but what makes it different from like a DataGrid, or even a ListBox? Don’t worry, we will cover this is a few minutes, further down below.
The definition, I guess?
Let’s first define, what a ListView really is by like definition:
A WPF ListView provides the basic tools needed, to help you displaying a set of data items. This can be easily done in like different views or layouts, depending on your usecase. Each item of those ListViews are displayed, using something called ListViewItem. A ListViewItem iteself is – more or less – just another template-ish element, being a ContentControl.
Examining the ListView
Let’s take a quick sneak peek into the inheritance-tree, of the WPF ListView Control, by pressing F12, while being on one of those with your mouse cursor. There you can see, that it actually inherits from the class ListBox.
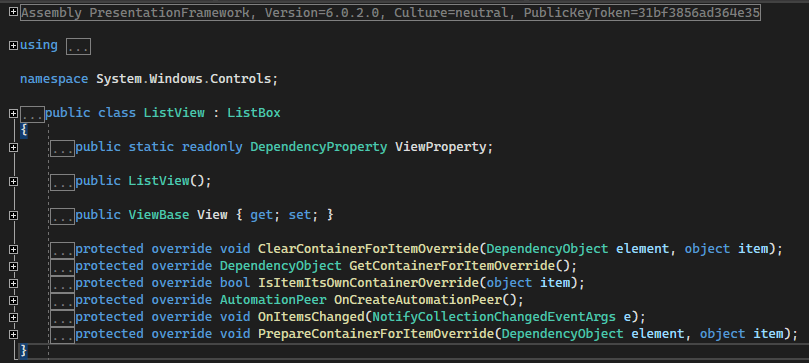
Inheritance tree
Going further down, there are some other classes in the inheritance tree as well, like the Selector & the ItemsControl class. I think, for most persons, it’s actually a surprise / a „good to know“-thing, that the ListView actually inherits from the ListBox class.
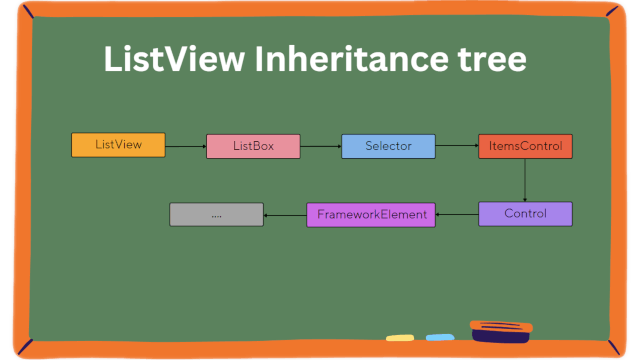
At this point, you can see, that there’s pretty much going on in the background. The ListView itself is actually derived from a few levels of control hierarchy and is therefore bringing a lot „to the table“. For sure, we can’t go to every level in detail, but I think the most important ones for you are beginning at the ItemsControl.
I mean, in a real application scenario, you would most likely fetch some data like the „charts“ or something like that. Those could then be displayed inside your ListView by specifying what should actually appear. The chart object could be composed from many different objects and therefore you would need to specify a bit further.
A first example – with XAML & code behind

Let’s now focus on creating an actual first example of the ListView Control. To do so, we usually need to first have some kind of data to display. At this point, we will just create some hardcoded items, to see, how the ListView and its ListViewItems are created in the first place. Keep in mind, that we will do this and more in an MVVM manner, later – which is the preferred way for me personally.
We will surround the ListView by a GroupBox Control, to have some kind of labelling, etc. So go ahead and create a GroupBox XAML markup inside your MainWindow.xaml (inside the root Grid). You can write something like „Music stars“, etc. inside the Header Property of that GroupBox, like this, we have some kind of heading for our list.
After that, we can add some sort of styling like padding, a width and alignments to that GroupBox, to make it look less bruised. The final, but first testing XAML code could therefore look like this:
    <Grid>
        <GroupBox Header="Some items" Padding="8" Width="200" VerticalAlignment="Center" HorizontalAlignment="Center">
            <ListView>
                <ListView.Items>
                    <ListViewItem Content="Jimmy Hendrix" />
                    <ListViewItem Content="Michael Jackson" />
                    <ListViewItem Content="The Beatles" />
                </ListView.Items>
            </ListView>
        </GroupBox>
    </Grid>
The visual representation of that XAML code from above, will just look as simple as this.
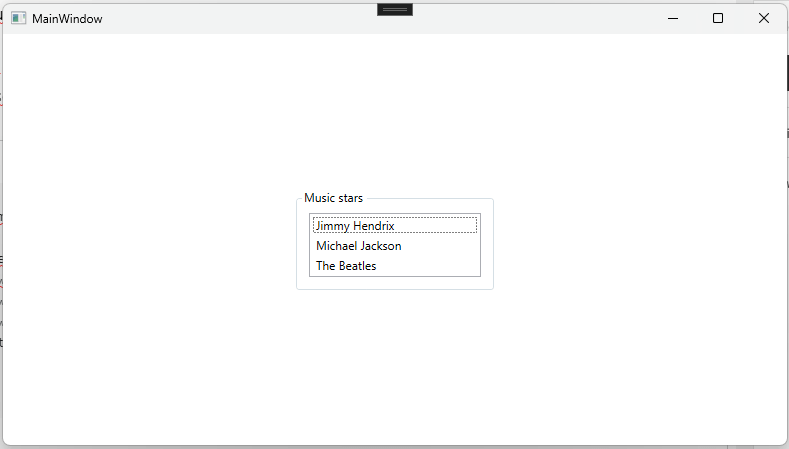
How to add items to the WPF ListView?
To add some items to the ListView in a „code behind“-manner, we need to specify a usual handler for like the click event, of for example a button. We can then react to that click inside of the handler and actually add a new item to the ListView. Go ahead and add a button inside of your MainWindow (Grid) and specify the „Click“-Property.
<Button Click="Button_Click" />
It will suggest, to create an actual handler, you can confirm this and press F12 while being on the „Button_Click“ text. After that, it will automatically jump to the corresponding part in your code – the code behind file. Feel free to rename that handler (in XAML & code) to pick a better name, like „btnAddItem_Click“.
Inside of the click handler, we need to somehow say: „Hey, ListView, please remove an item!“. And we are only able to do so, if we have something to talk to. Currently, the ListView doesn’t have a name, so you should go back and specify a name for it:
<ListView x:Name="MusicArtistList" ....>
    <!-- .... -->
</ListView>
The button click handler itself could just look like the following. We are just telling the property of the „MusicArtistList“, called „Items“: „Hey, please add another entry to yourself, thanks!“.
    private void Button_Click(object sender, RoutedEventArgs e)
    {
        MusicArtistList.Items.Add("Sam Smith");
    }
    Private Sub Button_Click(sender As Object, e As RoutedEventArgs)
        MusicArtistList.Items.Add("Sam Smith")
    End Sub
How to remove items from the ListView again?
If you have followed the above steps to actually add an item inside of our ListView, then you could be ready to remove it again. Keep in mind, that you should have like the click handler ready (by specifying the Buttons click property with like „btnRemove_Click“) and that the ListView needs a name. Otherwise, we wouldn’t be able to target it from the code behind file.
    private void btnRemove_Click(object sender, RoutedEventArgs e)
    {
        // this only works that easy due to our current "strings" example
        MusicArtistList.Items.Remove("Sam Smith");
    }
    Private Sub btnRemove_Click(sender As Object, e As RoutedEventArgs)
        ' this only works that easy due to our current "strings" example
        MusicArtistList.Items.Remove("Sam Smith")
    End Sub
How to delete the selected item in the ListView?
This one here is a bit different, because we can’t know at compile time, which one of the items, the user will select. We can’t therefore hardcode like a specific string thing, to be deleted later. We need a possibility, to get the currently selected item and delete it somehow.
This is actually pretty easy, as we get everything we need to know, from the ListView itself. We will first check, if there’s an actual selection and if so, we will delete that item by providing its index.
    private void btnRemoveSelectedItem_Click(object sender, RoutedEventArgs e)
    {
        bool noItemSelected = MusicArtistList.SelectedIndex == -1;
        if (noItemSelected)
            return;
        MusicArtistList.Items.RemoveAt(MusicArtistList.SelectedIndex);
    }
Private Sub btnRemoveSelectedItem_Click(sender As Object, e As RoutedEventArgs)
    Dim noItemSelected As Boolean = MusicArtistList.SelectedIndex = -1
    If noItemSelected Then
        Return
    End If
    MusicArtistList.Items.RemoveAt(MusicArtistList.SelectedIndex)
End Sub
Okay, but not flexible, nor practical – imo
So in the end, we just created a small ListView representation with like 3 entries for our music stars / artists. Currently, this isn’t really good, as it’s not dynamic or based on „real data“. We just hardcoded those ListViewItems inside the ListView and this isn’t pretty much practical.
The other problem with our current example is, that it’s not pretty flexible, currently we are having only like „1 Column“. With that, we can only display one „thing“ per item and we are not really different from a ListBox. What if we wanted to publish some sort of „year of birth“ information? I mean sure, we could just pump it into one string, but nah, that doesn’t feel right.
What we really need are some sort of columns and guess what, the ListView supports this out of the box, by just specifying the View property.
Working with „real data“ – MVVM approach

Moving away from that unpractical non-databased „stringish“ approach from above, we will now start a newer, clean version of our ListView Control. But first, we need to actually define „what“ to display, I mean, we need some sort of a so called „Model“ (or even a ViewModel – but I’ll leave it at that for now). As we wanted to display some sort of „music star“-overview, we could think of a better term in the first place. I will call it list of artists, so let’s now create a new class called „MusicArtist“ inside a matching folder.
Go ahead and create the corresponding folder inside your WPF project, first. We will call that folder like „Models“ – remember, I don’t want to go too deep into the MVVM cosmos. I would encourage you to refer to my C# MVVM post for that and don’t be confused, it will for work VB.NET as well. I mean the characteristics of Model-View-ViewModel are in the focus, not the language itself :).
The „MusicArtist“ model class
Thinking about the class itself and keeping our example from above in mind, we could say, that a music artist has the following properties. For sure, it’s just for our example and I’m trying to stay as easy as possible, so feel free to change anything you would like to.
using System;

namespace WpfListViewExampleCs.Models;

public class MusicArtist
{

    public string FirstName { get; set; }

    public string LastName { get; set; }

    public DateTime Birthday { get; set; }

    public MusicArtist(string firstName, string lastName, DateTime birthday)
    {
        FirstName = firstName;
        LastName = lastName;
        Birthday = birthday;
    }
}
Imports System

Namespace WpfListViewExampleCs.Models

    Public Class MusicArtist

        Public Property FirstName As String

        Public Property LastName As String

        Public Property Birthday As DateTime

        Public Sub New(firstName As String, lastName As String, birthday As DateTime)
            Me.FirstName = firstName
            Me.LastName = lastName
            Me.Birthday = birthday
        End Sub

    End Class

End Namespace
In my example here, the music artist has two properties for the name, meaning a first- and a lastname. I don’t like the „name“ only approach, as you can’t easily separate the names in some situations. Well, I mean yeah, before you mention it: „The Beatles“ isn’t really nicely separatable in this manner, but, welcome to the world of software development. I would say, this isn’t the right moment to argue about this, so feel free – again – to change that as you wish. Additionally I thought about using the birthday property, to show some sort of formatting in the XAML as well.
Displaying bound data inside the WPF ListView

After specifying some kind of model to actually display inside the ListView, we now go ahead and tell the ListView about its datasource. The ListView will then know: „Where can I fetch my data from? What is my data?“.
Preventing a known error
But before, we need to clean up the old code, otherwise we could run into an error like this:
System.InvalidOperationException: „The items collection must be empty before using itemssource“
To avoid this error, you need to remove the manually added items inside our XAML code. You can’t like say: „Hey, fetch the items from this datasource here“ AND put them in manually by XAML. Please go ahead and remove this marked area from the XAML code:
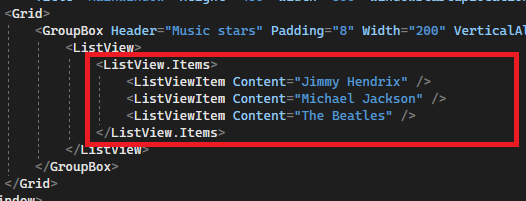
Giving the ListView its datasource
In the next step, we will actually care for some items being displayed. For this, we will use the DataSource property of the ListView and bind to some property from our ViewModel. Don’t be scared, if you don’t know what a ViewModel is! Maybe this is another chance, to refer to my blog post considering the MVVM pattern.
<ListView ItemsSource="{Binding MusicArtists}">
<!-- rest of the listview.. -->
</ListView>
We won’t create a separate ViewModel right now, for this simple example, we will use the MainWindow itself. This is pretty much easier at this point and it won’T push you too far away from the actual topic. Never the less, we still need a bindable property inside our MainWindow, which we are going to create, now.
Creating a bindable property
To create the announced property, just build some normal property inside your MainWindow (for example) called „MusicArtists“. This could look like the following code, keep in mind, that we should use something which implements the „INotifyCollectionChanged“ interface. But yes, I hear you, this should be a topic for another blog post, so just take it like that for now.
Next, create that property called „MusicArtists“ of type of „ObservableCollection“, with the generic type argument „MusicArtist“. We could also just make it like readonly, but those are fine tuning things, which aren’t necessary right now.
The last important step is, to say: „Hey, MainWindow, your DataContext is actually.. you!“. Then the MainWindow will know where to find the corresponding „MusicArtists“, which we are going to bind very soon from the XAML side. Take a look at the following example XAML code:
using System;
using System.Collections.ObjectModel;
using System.Windows;
using WpfListViewExampleCs.Models;

namespace WpfListViewExampleCs;

/// <summary>
/// Interaction logic for MainWindow.xaml
/// </summary>
public partial class MainWindow : Window
{

    public ObservableCollection<MusicArtist> MusicArtists { get; set; }

    public MainWindow()
    {
        InitializeComponent();
        MusicArtists = new ObservableCollection<MusicArtist>();
        DataContext = this;
    }
}
Imports System
Imports System.Collections.ObjectModel
Imports System.Windows
Imports WpfListViewExampleCs.Models

Namespace WpfListViewExampleCs

    Public Partial Class MainWindow
        Inherits Window

        Public Property MusicArtists As ObservableCollection(Of MusicArtist)

        Public Sub New()
            InitializeComponent()
            MusicArtists = New ObservableCollection(Of MusicArtist)()
            DataContext = Me
        End Sub

    End Class

End Namespace
Filling up some data
Currently, the ListView wouldn’t be able to display much, because there just aren’t no items inside the „MusicArtists“, yet. So in the next step we are going to fill up some items, to make the ListView be able to display those. This is the reason, why we added a quick constructor inside the „MusicArtist“ class: Creating quick example artists.
Let’s re-create the MainWindow constructor for this:
// rest of the MainWindow code behind file

    public MainWindow()
    {
        InitializeComponent();
        MusicArtists = new ObservableCollection<MusicArtist>();
        MusicArtists.Add(new MusicArtist("Jimmy", "Hendrix", new DateTime(1942, 11, 27)));
        MusicArtists.Add(new MusicArtist("Michael", "Jackson", new DateTime(1958, 8, 29)));
        MusicArtists.Add(new MusicArtist("The", "Beatles", new DateTime(1960, 1, 1)));
        DataContext = this;
    }

// rest of the MainWindow code behind file
' rest of the MainWindow code behind file

Public Sub New()
    InitializeComponent()
    MusicArtists = New ObservableCollection(Of MusicArtist)()
    MusicArtists.Add(New MusicArtist("Jimmy", "Hendrix", New DateTime(1942, 11, 27)))
    MusicArtists.Add(New MusicArtist("Michael", "Jackson", New DateTime(1958, 8, 29)))
    MusicArtists.Add(New MusicArtist("The", "Beatles", New DateTime(1960, 1, 1)))
    DataContext = Me
End Sub

' rest of the MainWindow code behind file
But it’s displaying rubbish now?
If you are looking at the current results, you would pretty much only see rubbish. If you didn’t look until now, please watch the following screenshot, then you probably will. The items are more or less being displayed, but there’s only something like „Blabla.Bla.MusicArtist“ written.
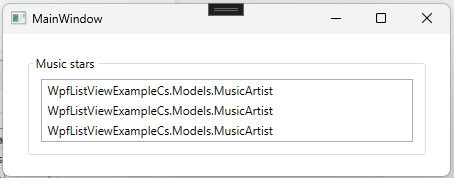
The reason for that is, that the corresponding ListViewItem actually knows: „Hey, there is something called MusicArtist“. But it’s also asking itself: „well, how am I supposed to display this? Property A, B, C, WHAT!?“. In the end it thinks: „You know what, dev? I’m just going to display THAT over here“.
By „that“ I’m meaning the complete path to the corresponding class instance type. We are having a class called „MusicArtist“ inside our project called „WpfListViewExampleCs“ AND inside the „Models“ namespace. So this is basically why that „rubbish“ comes out of it, it displays the complete namespace to class path!
Overriding that „default-rubbish“
Before we are going to use the final solution for this, I first want to explain and show you, how you could potentially solve it at this point. Please keep in mind, that this solution depends on your usecase! Usually, if you want to display like „multiple columns“, you would actually need – well – multiple columns.
In the image from above, you are seeing the default object class „ToString“ output. To change it, you can just override it in your derived class – being the „MusicArtist“-class like in a second. Hint: I’m using the newer, shorter version of the overriding functionality. This means, no body parantheses and an arrow (for C#), as well as string interpolation (for both languages).
You could add this to the „MusicArtist“ class:
// rest of the MusicArtist class

public override string ToString()
    => $"{FirstName} {LastName}";

// rest of the MusicArtist class
' rest of the MusicArtist class

Public Overrides Function ToString() As String
    Return $"{FirstName} {LastName}"
End Function

' rest of the MusicArtist class
So the current / new output would look like this:
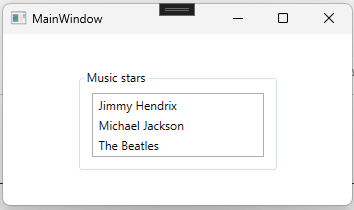
Using the ListViews „View“ Property creating columns

After cleaning up that „namespace and class“-mess we saw in the last section, we now can go the last step (I think). Currently, our ListView is only displaying some kind of single dimensioned data, which is not thaaaat bad, but I guess bad for multi-dimensioned data? What if I wanted to have some sort of separated columns for first and last name? This is exactly, where the so called „View“-property of the WPF ListView comes into play!
But why a ListView, why no DataGrid instead?
Sure, you could ask yourself: „Why would I use a ListView, when I could use a DataGrid instead?“. The answer is: „It depends“, yeah, I hate those answers as well.. Usually there’s one rule floating around in the internet: Use a DataGrid, if you need editing, use a ListView otherwise – bang. I would pretty much love going deeper into this topic, but well, I think this post is already too big, isn’t it?
Specifying a „View“-template
To start creating those columns we talked about, we need to specify some sort of template for the View property. But it’s not a usual „DataTemplate“, it’s something more special, lemme give you an example. The basic view provided from WPF itself, is something called a „GridView“. I mean, the name pretty much suggests what it is. If needed, you could create something similiar for your own needs, but again, I think this would blow up this post even more..
So let’s stick with the basic GridView for now. Back into your MVVM prepared ListView, we can now provide a GridView template for our ListView. Watch out for that nice string format functionality, where I specified a custom format for that birthday binding. Basically all you have to do is, providing the columns you want, with a header of your choice. Then you need to tell the ListViewItem, where it should pull the data from (being the DisplayMemberPath-Binding).
            <ListView ItemsSource="{Binding MusicArtists}">
                <ListView.View>
                    <GridView>
                        <GridView.Columns>
                            <GridViewColumn Header="FirstName" DisplayMemberBinding="{Binding FirstName}" />
                            <GridViewColumn Header="LastName" DisplayMemberBinding="{Binding LastName}" />
                            <GridViewColumn Header="Birthday" DisplayMemberBinding="{Binding Birthday, StringFormat={}{0:dd.MM.yyyy}}" />
                        </GridView.Columns>
                    </GridView>
                </ListView.View>
            </ListView>
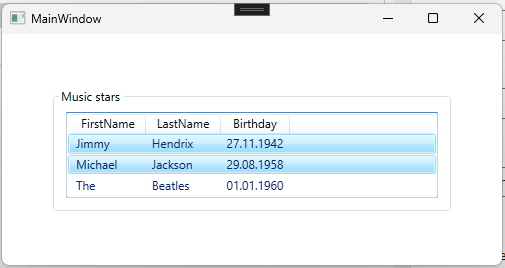
And finally, you end up having this nice thing here:
Adding, removing, etc. the MVVM way – preparations
Because it’s a bit harder, I saved this topic (and other) for the end of this blog post. You actually need some sort of „ICommand“ implementation, which we won’t cover here, but I will give you the example code needed. There will be another blog post about those commands in english, currently, it’s only available in german, sorry.
A DelegateCommand base class
Please go ahead and create another folder inside your project, called „Utils„. We will deposit a small class over there, which helps us with the buttons in MVVM style. The class I’m talking about looks like this, it’s a basic implementation of a delegated action (with check) for the ICommand-interface:
using System.Windows.Input;
using System;

namespace Utils
{
    public class DelegateCommand : ICommand
    {
        private Action<object?> _action;

        private Func<object?, bool>? _canExecute;

        public DelegateCommand(Action<object?> action)
        {
            _action = action;
        }

        public DelegateCommand(Action<object?> action, Func<object?, bool> canExecute)
        {
            _action = action;
            _canExecute = canExecute;
        }

        public void Execute(object? parameter)
        {
            _action(parameter);
        }

        public bool CanExecute(object? parameter)
        {
            if (_canExecute == null)
                return true;
            return _canExecute(parameter);
        }

        public void RaiseCanExecuteChanged()
        {
            CanExecuteChanged?.Invoke(this, EventArgs.Empty);
        }

        public event EventHandler? CanExecuteChanged;
    }
}
Namespace Utils
    Public Class DelegateCommand
        Implements ICommand
        Private _action As Action(Of Object)
        Private _canExecute As Func(Of Object, Boolean)
        Sub New(action As Action(Of Object))
            _action = action
        End Sub
        Sub New(action As Action(Of Object), canExecute As Func(Of Object, Boolean))
            _action = action
            _canExecute = canExecute
        End Sub
        Public Sub Execute(parameter As Object) Implements ICommand.Execute
            ' führt unsere von außen mitgegebene Aktion aus und übergibt auch den Parameter
            _action(parameter)
        End Sub
        Public Function CanExecute(parameter As Object) As Boolean Implements ICommand.CanExecute
            If _canExecute Is Nothing Then
                Return True
            End If
            Return _canExecute(parameter)
        End Function
        Public Event CanExecuteChanged As EventHandler Implements ICommand.CanExecuteChanged
    End Class
End Namespace
A PropertyChangedBase class
Without going into too much detail, please copy this class and put it into the „Utils“ folder as well. There is a blog post for the INotifyPropertyChanged-interface, but currently it’s only in german. Maybe you could use a browser-translator for now, but I will add the english version soon. So now, please take this class:
using System.Runtime.CompilerServices;
using System.ComponentModel;

namespace Utils;

public abstract class PropertyChangedBase : INotifyPropertyChanged
{
    protected void NotifyOfPropertyChange([CallerMemberName] string? propertyName = null)
    {
        PropertyChanged?.Invoke(this, new PropertyChangedEventArgs(propertyName));
    }
    public event PropertyChangedEventHandler? PropertyChanged;
}
Imports System.ComponentModel
Imports System.Runtime.CompilerServices

Namespace Utils

    Public Class PropertyChangedBase
        Implements INotifyPropertyChanged

        Protected Sub NotifyOfPropertyChange(<CallerMemberName> Optional propertyName As String = Nothing)
            RaiseEvent PropertyChanged(Me, New PropertyChangedEventArgs(propertyName))
        End Sub

        Public Event PropertyChanged As PropertyChangedEventHandler Implements INotifyPropertyChanged.PropertyChanged

    End Class

End Namespace
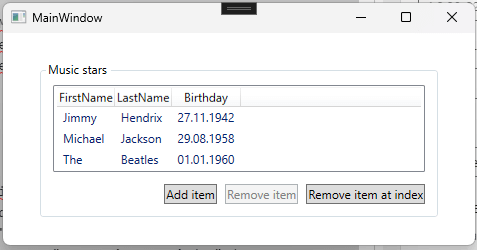
Please add something like a StackPanel and 3 Buttons inside of it. There will be one button for adding and one for removing an item at a specific position. The third button will be for removing the selected item. At this point, we will also those commands, please have a look at the following XAML. Please pardon me for not making this visually appealing, it’s only for its functional purpose.
Keep in mind, that you also need to create 3 new properties of type of „DelegateCommand“, 1 for each command, being:
- AddItemCommand
- RemoveItemCommand
- RemoveItemAtIndexCommand
        <GroupBox Header="Music stars" Padding="8" Width="400" VerticalAlignment="Center" HorizontalAlignment="Center">
            <StackPanel>
                <ListView SelectedItem="{Binding SelectedMusicArtist}" ItemsSource="{Binding MusicArtists}">
                    <ListView.View>
                        <GridView>
                            <GridView.Columns>
                                <GridViewColumn Header="FirstName" DisplayMemberBinding="{Binding FirstName}" />
                                <GridViewColumn Header="LastName" DisplayMemberBinding="{Binding LastName}" />
                                <GridViewColumn Header="Birthday" DisplayMemberBinding="{Binding Birthday, StringFormat={}{0:dd.MM.yyyy}}" />
                            </GridView.Columns>
                        </GridView>
                    </ListView.View>
                </ListView>
                <StackPanel Orientation="Horizontal" Margin="0 12 0 0" HorizontalAlignment="Right">
                    <Button Command="{Binding AddItemCommand}" Content="Add item" Margin="0 0 8 0" />
                    <Button Command="{Binding RemoveItemCommand}" Content="Remove item" Margin="0 0 8 0" />
                    <Button Command="{Binding RemoveItemAtIndexCommand}" Content="Remove item at index" />
                </StackPanel>
            </StackPanel>
        </GroupBox>
The „new“ UI now looks like this:
The MainViewModel
Now create a new folder called „ViewModels“ and a „MainViewModel“ class inside. Let the „MainViewModel“ class inherit from the „PropertyChangedBase“ you copied from the previous paragraph. The view (code behind) file should now be abandoned as it’s getting too much otherwise.
Over here we fully implemented the „SelectedMusicArtist“-property to actually tell the „RemoveItemCommand“: „Hey, here was something selected, check if you can be executed now“. We’re subscribing to the „CollectionChanged“ event of the ObservableCollection as well. This way, we can also refresh the commands state, when the collection is changed.
In the next steps, we are going to instantiate the commands and therefore telling them, what to do and when.
using System;
using System.Collections.ObjectModel;
using System.Collections.Specialized;
using Utils;
using WpfListViewExampleCs.Models;

namespace WpfListViewExampleCs.ViewModels;

public class MainViewModel : PropertyChangedBase
{

    public ObservableCollection<MusicArtist> MusicArtists { get; set; }

    private MusicArtist? _selectedMusicArtist;

    public MusicArtist? SelectedMusicArtist
    {
        get => _selectedMusicArtist;
        set
        {
            if (_selectedMusicArtist == value)
                return;
            _selectedMusicArtist = value;
            RemoveItemCommand.RaiseCanExecuteChanged();
        }
    }

    public DelegateCommand AddItemCommand { get; set; }

    public DelegateCommand RemoveItemCommand { get; set; }

    public DelegateCommand RemoveItemAtIndexCommand { get; set; }

    public MainViewModel()
    {
        MusicArtists = new ObservableCollection<MusicArtist>();
        MusicArtists.CollectionChanged += MusicArtists_CollectionChanged;
        MusicArtists.Add(new MusicArtist("Jimmy", "Hendrix", new DateTime(1942, 11, 27)));
        MusicArtists.Add(new MusicArtist("Michael", "Jackson", new DateTime(1958, 8, 29)));
        MusicArtists.Add(new MusicArtist("The", "Beatles", new DateTime(1960, 1, 1)));
    }

    private void MusicArtists_CollectionChanged(object? sender, NotifyCollectionChangedEventArgs e)
    {
        RemoveItemCommand.RaiseCanExecuteChanged();
        RemoveItemAtIndexCommand.RaiseCanExecuteChanged();
    }

}
Imports System
Imports System.Collections.ObjectModel
Imports System.Collections.Specialized
Imports Utils
Imports WpfListViewExampleCs.Models

Namespace WpfListViewExampleCs.ViewModels

    Public Class MainViewModel
        Inherits PropertyChangedBase

        Public Property MusicArtists As ObservableCollection(Of MusicArtist)

        Private _selectedMusicArtist As MusicArtist?

        Public Property SelectedMusicArtist As MusicArtist?
            Get
                Return _selectedMusicArtist
            End Get
            Set(ByVal value As MusicArtist?)
                If _selectedMusicArtist = value Then Return
                _selectedMusicArtist = value
                RemoveItemCommand.RaiseCanExecuteChanged()
            End Set
        End Property

        Public Property AddItemCommand As DelegateCommand

        Public Property RemoveItemCommand As DelegateCommand

        Public Property RemoveItemAtIndexCommand As DelegateCommand

        Public Sub New()
            MusicArtists = New ObservableCollection(Of MusicArtist)()
            AddHandler MusicArtists.CollectionChanged, AddressOf MusicArtists_CollectionChanged
            MusicArtists.Add(New MusicArtist("Jimmy", "Hendrix", New DateTime(1942, 11, 27)))
            MusicArtists.Add(New MusicArtist("Michael", "Jackson", New DateTime(1958, 8, 29)))
            MusicArtists.Add(New MusicArtist("The", "Beatles", New DateTime(1960, 1, 1)))
        End Sub

        Private Sub MusicArtists_CollectionChanged(ByVal sender As Object?, ByVal e As NotifyCollectionChangedEventArgs)
            RemoveItemCommand.RaiseCanExecuteChanged()
            RemoveItemAtIndexCommand.RaiseCanExecuteChanged()
        End Sub

    End Class

End Namespace
Assign a ViewModel to the MainWindow
To be able to this all work, make sure, you set an appropriate ViewModel for your MainWindow. Otherwise, the binding system wouldn’t know, where to search for your bindings. This is done by adding this code to your MainWindow XAML file:
<!-- create a namespace mapping at the top of your file -->
xmlns:vm="clr-namespace:WpfListViewExampleCs.ViewModels"

<!-- Set the DataContext MainViewModel instance by XAML -->
<Window.DataContext>
    <vm:MainViewModel />
</Window.DataContext>
How to add WPF ListView items with MVVM
After you got our little helper class from above inside your „Utils“ folder and everything else ready, we can now continue. Adding items is now kinda different, because our items are actually bound and not just simple strings. Our commands wants at least to know, what it should do, when executed. We can pass a function, to let the command determine, if it can be executed. I mean, we don’t want a „remove selected item“ to happen, when there’s no item, right?
The following code is needed for the actual functionality: Instantiate the command inside the constructor (don’t forget to take the command property from above!).
    // other properties

    public DelegateCommand AddItemCommand { get; set; }

    public MainViewModel()
    {
        AddItemCommand = new DelegateCommand(AddItem);

        // list instantiation etc..
    }

    // the delegate function to be executed on click
    private void AddItem(object? parameter)
    {
        // adding miley cyrus, as we have no dynamic dialog, as it's not a part of this here..
        MusicArtists.Add(new MusicArtist("Miley", "Cyrus", new DateTime(1992, 11, 23)));
    }
    ' other properties

    Public Property AddItemCommand As DelegateCommand

    Sub New()
        AddItemCommand = new DelegateCommand(AddItem);

        ' list instantiation etc..
    End Sub

    Private Sub AddItem(parameter As Object)
        MusicArtists.Add(New MusicArtist("Miley", "Cyrus", New DateTime(1992, 11, 23)))
    End Sub
Removing the selected item MVVM style
The important thing here is, that we can only remove a selected item, if there is actually one selected. Please check the „SelectedMusicArtist“-property from the above MainViewModel for this. If the selected item (therefore the SelectedMusicArtist) changes, we tell the command to refresh.
    // other properties

    public DelegateCommand RemoveItemCommand { get; set; }

    public MainViewModel()
    {
        RemoveItemCommand = new DelegateCommand(RemoveItem, CanRemoveItem);

        // list instantiation etc..
    }

    private void RemoveItem(object? parameter)
    {
        // we should know that SelectedMusicArtist isn't null, therefore the !
        MusicArtists.Remove(SelectedMusicArtist!);
    }

    private bool CanRemoveItem(object? parameter)
    {
        return SelectedMusicArtist != null;
    }
    ' other properties

    Public Property RemoveItemCommand As DelegateCommand

    Sub New()
        RemoveItemCommand = new DelegateCommand(RemoveItem, CanRemoveItem);

        ' list instantiation etc..
    End Sub

    Private Sub RemoveItem(parameter As Object)
        MusicArtists.Remove(SelectedMusicArtist)
    End Sub

    Private Function CanRemoveItem(parameter As Object) As Boolean
        Return SelectedMusicArtist IsNot Nothing
    End Function
Deleting an item by index, MVVM like
In the last example, we do pretty much the same, but with some hardcoded index, just as an example!
    // other properties

    public DelegateCommand RemoveItemAtIndexCommand { get; set; }

    public MainViewModel()
    {
        RemoveItemAtIndexCommand = new DelegateCommand(RemoveItemAtIndex, CanRemoveItemAtIndex);

        // list instantiation etc..
    }

    private void RemoveItemAtIndex(object? parameter)
    {
        // we need at least one item inside
        MusicArtists.RemoveAt(0);
    }

    private bool CanRemoveItemAtIndex(object? parameter)
    {
        return MusicArtists.Count > 0;
    }
    ' other properties

    Public Property RemoveItemAtIndexCommand As DelegateCommand

    Sub New()
        RemoveItemAtIndexCommand = new DelegateCommand(RemoveItemAtIndex, CanRemoveItemAtIndex);

        ' list instantiation etc..
    End Sub

    Private Sub RemoveItemAtIndex(parameter As Object)
        MusicArtists.RemoveAt(0)
    End Sub

    Private Function CanRemoveItemAtIndex(parameter As Object) As Boolean
        MusicArtists.Count > 0
    End Function
Summing up
If you want to have a control, which is able to display things in like a list, being able to select one or more items out of it, the ListView is possibly your choice. When thinking about: „Should I use a ListView or a DataGrid“, you should choose the ListView, if editing is not a concern. As mostly always, you have the option to go for the code behind, or the MVVM approach, I would personally always choose the MVVM one. It seems much cleaner for my personal preferences and doesn’t mix up UI with business code. Feel free to leave any comment on how to improve this article, or if I may explained something wrong.
Downloads
If you need quick and ready to use examples, just go ahead and download the ones you need. Maybe I’ll add some more later.
