How to create a VB NET DataGridView filter functionality in 2024

Inhaltsverzeichnis
- 1 How to make a VB NET DataGridView filter!?
- 2 Different situations require different solutions
- 3 Using a bound list for a VB NET DataGridView filter
- 3.1 An easy and clean data source – An extended BindingList
- 3.2 Creating the customer class
- 3.3 Creating the user interface for the VB NET DataGridView filter example
- 3.4 The Code – VB NET DataGridView filter example 1
- 3.4.1 The forms properties
- 3.4.2 Instantiating the form – The Constructor
- 3.4.3 The forms Load-EventHandler
- 3.4.4 The LoadTestCustomers method
- 3.4.5 SearchCustomers method definition
- 3.4.6 Performing the filtering by FilterCustomers method
- 3.4.7 Reacting to user pressing Enter – a UI/UX thingy
- 3.4.8 The button event handlers
- 4 Conclusion
- 5 Downloads
- 6 Related posts
How to make a VB NET DataGridView filter!?
I welcome you to todays post on „How to make a VB NET DataGridView filter„!
Maybe you came across randomly, or you actively searched for that typical issue.
If you’ve searched it, well theres no big surprise, because it’s one well known problem.
Literally every (VB NET) Developer will face this issue from time to time, or even more than once.
Usually you have that typical user interface with some kind of listing, whether it’s a typical table (hence a DataGridView) or it’s based on tiles.
If the user will then click on one of those rows or tiles, you will mostly show some fancy dialog thingy, to edit this data.
After the user has finished working on that detail dialog, it will usually close and save the changed data back to the data source.
Preview of what we are going to build
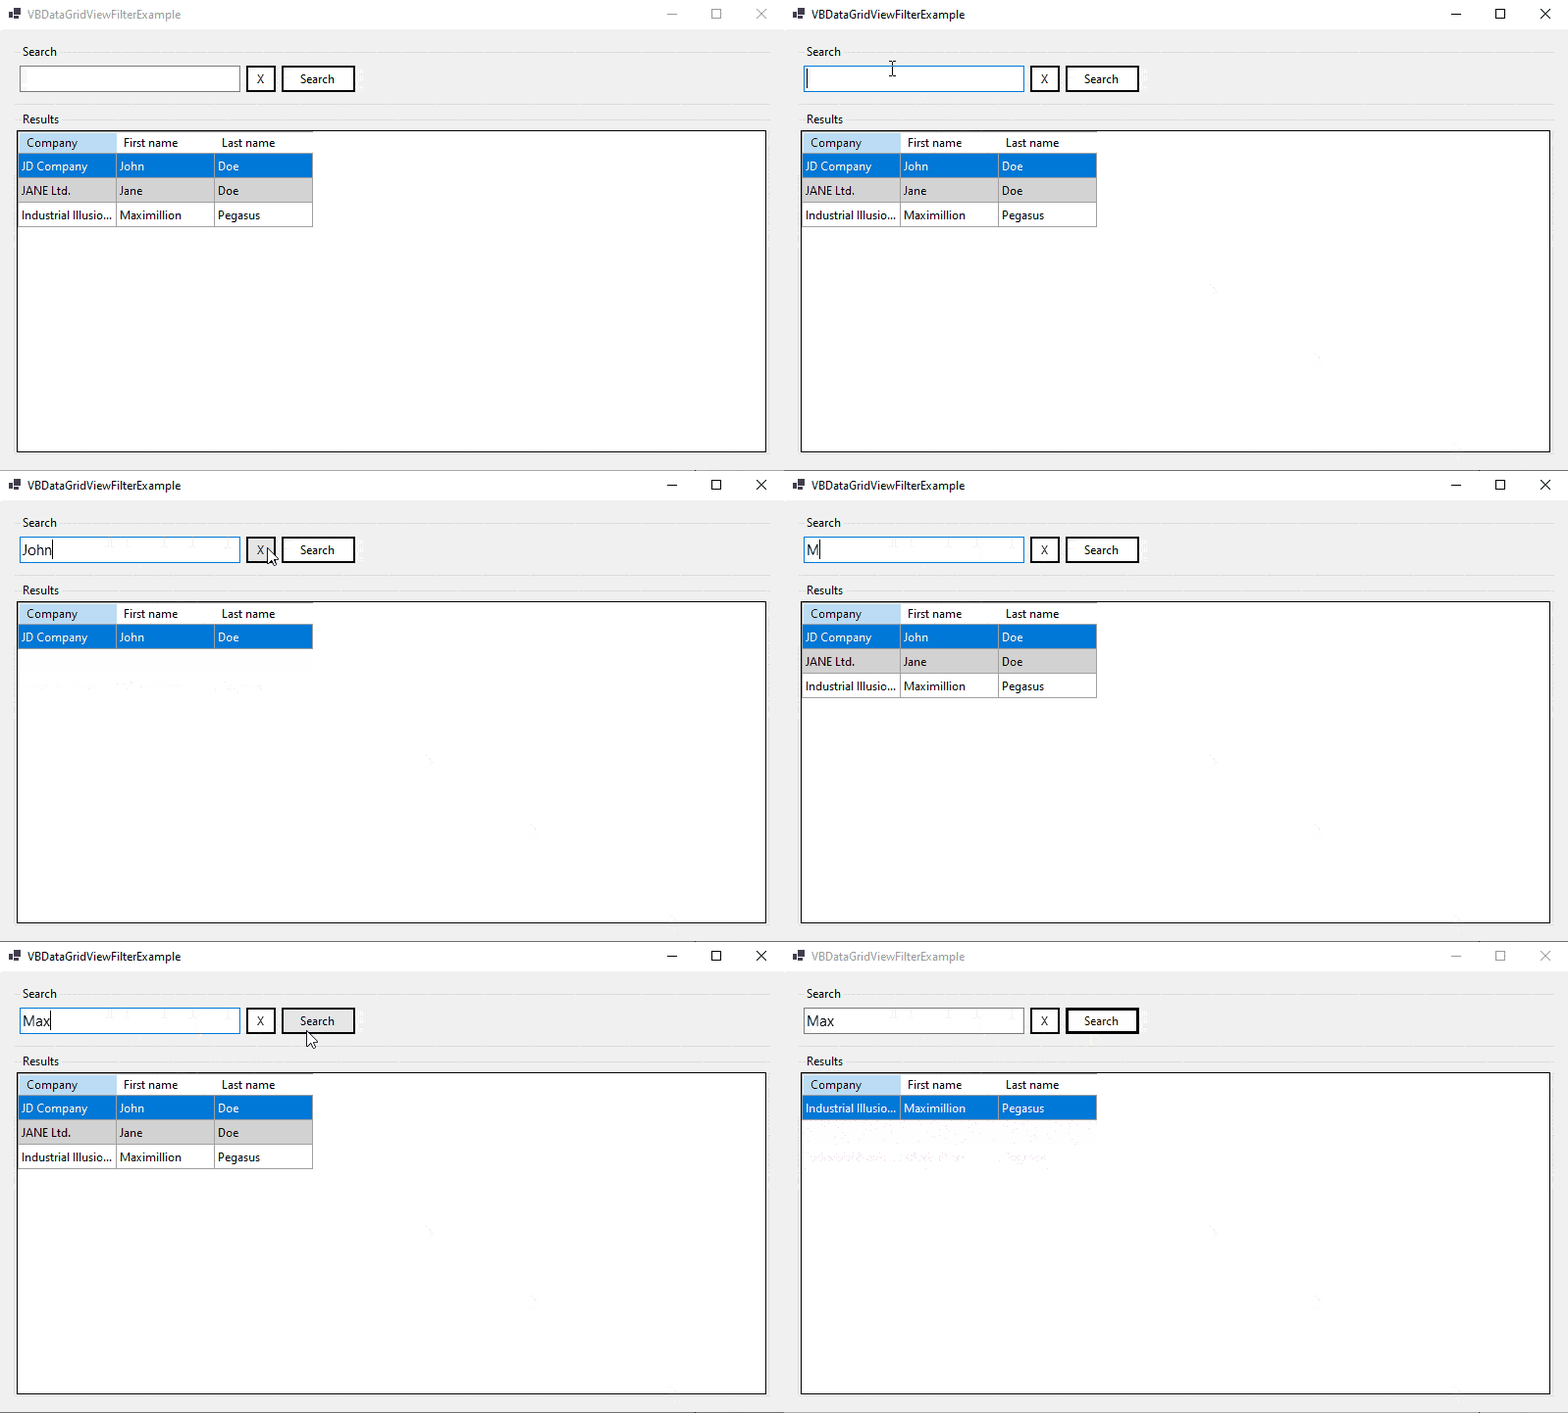
As I’m a fan of action instead of talking only, here’s a brief example of what we are going to build.
We will have a basic form split in two areas:
- One area for some sort of search inputs (add as much as you like)
- The second area is an auto growing / shrinking datagridview
You can enter a specific search text and then confirm the search by pressing enter or the corresponding button.
There will be some kind of reset functionality by clicking the „X„-button, or by using the escape key.

One very basic task
So it’s actually one of the big basic tasks, you need to understand in detail.
In this post, you will get a nice datagridview filtering example with some sub-steps.
This will consist of acquiring data from the very base, over creating a nice GUI to get user input and at last filtering that data.
To actually search for anything, you will need some kind of data source, right!?
Some sweet spot, where the data is actually coming from, whether it’s
- A database-ish thingy
- Some „In-Memory“ cache
- Or maybe some file based storage like a text file
Otherwise it would be kinda hard to actually find out:
- when to retrieve data?
- from where?
- or most importantly – how?
Thinking about structure
Surely you should structure your application in a properly designed way – like always!
What I’m talking about is: Using interfaces for abstracting away implementation details.
This makes our application much more flexible thus being able to switch out dependencies easily.
Or something like dependency injection, to provide needed dependencies from the outside.
With this approach, we can avoid hardcoding dependencies inside the classes themselves.
But we will dive much deeper on that in separate blog posts, so i may only touch the very basics here – if at all 🤷♂️.
Different situations require different solutions

As you might know, there are quite a few different situations of having data inside your DataGridView.
The 3 methods below are the ones I’ve seen the most:
- Adding data directly
- A list of objects as source
- The thing called DataView
To elaborate on this further: Basically you have 3 modes to work with the DataGridView.
Keep in mind, that those 3 here don’t necessarily match up to the ones above, as 2 of the ones above are basically bound.
- Unbound
- Bound
- Virtual
You can find more detailed information on that, you can visit the microsoft documentation for that.
Honestly I would recommend you reading my example implementations as they are much easier to understand and follow.
Adding data directly to the DataGridView – Don’t!
The easiest and most beginner friendliest way is to directly add your data to the DataGridView.
This is done by calling some kind of „CollectionThingy.Add“ functionality.
Even though this seems to be the easy „Hey, I could just go like this“ way, it isn’t necessarily the best one.
I’m talking about structuring and especially about maintaining and advancing development.
I’ve seen myself struggling through other developers chaotic „DataGridView.Rows.Add“ code so many times.
So I would highly (really) recommend you not to do it this way!
Using a list as datasource
Using a pure list – a special one – is actually my personally most used style of populating a DataGridView.
Therefore I also like to filter the data directly by using that list, instead of operating on those DataGridView rows themselves.
This works strongly typed and is (at least in my opinion) easy to implement.
It also feels kinda clean like „filtering customers by filtering customers“ you know what I mean!?
I would recommend this method and this is actually the method we’re using in our first example here.
Utilizing a DataView
This is actually my personally least used method of filtering or populating data inside a DataGridView.
Honestly I can’t even remember when I used that method the last time so..
Maybe I’ll add some example of using this at a later point, because I want to focus on the most used style first.
Using a bound list for a VB NET DataGridView filter

So in the very first and most „natural“ kind of DataGridView filter example, we will touch the clean basics.
In a few moments, you will understand this „clean“ & „natural“ thing and the „why“ behind that.
I think that this is actually one of the easiest ways to understand, as there are no fancy or complex other tools involved.
But well, one additional „helper“ is actually used, as we are in the need of some kind of listing functionality.
This listing thing is actually responsible for holding those different entries and being able to communicate it’s internal changes.
With those communication skills, the outer world can react to changes by like refreshing their graphical representation.
An easy and clean data source – An extended BindingList
So in this very first example we will use a basic BindingList as indirect data source.
As I really prefer the object oriented way the most, we will create the data based on defined class instances.
This means we will need a class to create some kind of blueprint, that enables us encapsulating the needed data.
After that and after instantiating some objects, we can tell the DataGridView to display the data.
Or better said, we can tell the grid to use these object instances as datasource – nice!
One big problem with the default BindingList class is, that you can’t really add multiple items at once.
As you will see later, we will need that functionality, so we will define a small helper extension method first.
Create a folder called „Utils„, put the following class inside and watch out for namespacing issues:
Imports System.ComponentModel
Imports System.Runtime.CompilerServices

Namespace Utils

    Module BindingListExtensions

        <Extension()>
        Public Sub AddRange(Of T)(bindingList As BindingList(Of T), collection As IEnumerable(Of T))
            Dim oldRaiseEvents = bindingList.RaiseListChangedEvents
            bindingList.RaiseListChangedEvents = False
            Try
                For Each item In collection
                    bindingList.Add(item)
                Next
            Finally
                bindingList.RaiseListChangedEvents = oldRaiseEvents
                If bindingList.RaiseListChangedEvents Then
                    bindingList.ResetBindings()
                End If
            End Try
        End Sub

    End Module

End Namespace
With this BindingList class extending functionality, we will be able to add multiple items.
In addition, this won’t trigger a „Hey I’ve changed“-notification for each add, this would be inefficient.
Imagine you would be adding 30000 items and therefore 30000 change notifications would be triggered.
Wouldn’t it simply be enough to add those elements and notify about a change of this list after all work has been done – meaning once!?
For this to work, we need to disable the „RaiseListChangedEvents“-property temporarily, or as long as the adding process is ongoing.
As this is one very basic requirement for many projects, you should really be saving that extension method somewhere 😛!
Let’s go to the next step of making that VB NET DataGridView filter functionality!
Creating the customer class
So let’s now go ahead and actually create this blueprint class called „Customer“ for our first example.
I mean seriously, who doesn’t like working with (good, on time paying) customers 😛.
Keep in mind, that this example will only contain like basic data and no deep structures.
Take care putting the class into the correctly named folder and watch the namespace!
Create a folder called „Models“ and add the following class inside:
Namespace Models

    Public Class Customer

        Public Property FirstName As String

        Public Property LastName As String

        Public Property Company As String

        Sub New(firstName As String, lastName As String, company As String)
            Me.FirstName = firstName
            Me.LastName = lastName
            Me.Company = company
        End Sub

    End Class

End Namespace
Creating the user interface for the VB NET DataGridView filter example

In this last step of the first example, we will actually work on the graphical user interface (GUI) part.
As this is a DataGridView example (so no WPF involved), we will use a good old Windows Forms Project (Winforms project).
If you have missed the example preview, you can scroll back to the above section here.
Needed controls
So in order to create our example user interface we need the following controls:
- A form with set StartPosition, Text and size
- One TableLayoutPanel (as we want dynamic resizing)
- Groupboxes (2) for the main areas
- One FlowLayoutPanel for arranging the search inputs
- a Textbox for searching by text input
- 2 buttons (searching and resetting the search)
- The last control is the DataGridView itself
Surely you can add or remove things on your personal needs..
The Code – VB NET DataGridView filter example 1
Now, inside our code, we will start by importing all necessary namespaces.
I called my example project „VBDataGridViewFilterExample„, so make sure to adjust that to your project name if needed.
Imports System.ComponentModel
Imports VBDataGridViewFilterExample.Models
Imports VBDataGridViewFilterExample.Utils
The forms properties
Then we will need to define 3 properties inside our „Form1“ class (or however you’ve called it).
The first property called „Customers“ is the storage for our customer instances.
As I have mentioned above you should go for something like dependency injection, etc.
In this case it will be enough working like this, as I don’t want to make it too difficult anyways.
The next property „FilteredCustomers“ will be the actual (potentially filtered) customers list, which is the datasource for our DataGridView.
Finally, the last property is some kind of user input field, where the user can enter some string to filter the customers by.
    Public Property Customers As List(Of Customer)

    Public Property FilteredCustomers As BindingList(Of Customer)

    Public Property SearchText As String
Instantiating the form – The Constructor
Now it’s time to let the form actually come to reality by filling its constructor code.
Sub New()
    InitializeComponent()
    Customers = New List(Of Customer)()
    FilteredCustomers = New BindingList(Of Customer)()
    SearchText = String.Empty
    tbSearch.DataBindings.Add(NameOf(Text), Me, NameOf(SearchText), False, DataSourceUpdateMode.OnPropertyChanged)
End Sub
The first call is the „InitializeComponent„-function – like literally always.
Next, we will instantiate both list objects called „Customers“ and „FilteredCustomers“.
Then we are going to initialize the „SearchText“ property with an empty string, so it’s not „Nothing“.
The forms Load-EventHandler
Private Sub Form1_Load(sender As Object, e As EventArgs) Handles MyBase.Load
    tbSearch.DataBindings.Add(NameOf(Text), Me, NameOf(SearchText), False, DataSourceUpdateMode.OnPropertyChanged)
    LoadTestCustomers()
    dgvCustomers.DataSource = FilteredCustomers
    SearchCustomers()
End Sub
Inside the forms load eventhandler, theres also some work to do like configuring the bindings, etc.
So let’s start by binding the „SearchText„-property to our corresponding textboxes „Text“-property.
We are using a nice operator called „NameOf„, as this can help with later naming conflicts.
If you would be calling:
tbSearch.DataBindings.Add(Text, Me, "SearchText", False, DataSourceUpdateMode.OnPropertyChanged)
and change the „SearchText“-property to a different name later on, you could run into problems.
Changing „SearchText“ to like „Search„, would lead the binding above to fail, if you don’t apply the change there as well.
But changing when using the „NameOf„-operator will instantly notify you about this.
I will talk about that „DataSourceUpdateMode„-part in a few moments, so be patient.
Then we will continue by loading some customer test data into our backing storage list.
You will see the implementation for that method in some seconds, too!
After that, we’re setting the DataGridViews DataSource property, to our „FilteredCustomers“ BindingList.
In the last step of the load eventhandler, we will trigger a simulated search, to make some data appear at the start.
The LoadTestCustomers method
This method will load some test customers into our basic storage list.
So nothing big is happening here, except creating 3 customers and adding them to the list.
Private Sub LoadTestCustomers()
    Customers.Add(New Customer("John", "Doe", "JD Company"))
    Customers.Add(New Customer("Jane", "Doe", "JANE Ltd."))
    Customers.Add(New Customer("Maximillion", "Pegasus", "Industrial Illusions"))
End Sub
SearchCustomers method definition
Private Sub SearchCustomers()
    If FilteredCustomers.Count > 0 Then
        FilteredCustomers.Clear()
    End If
    Dim searchResults = Customers.Where(AddressOf FilterCustomers)
    FilteredCustomers.AddRange(searchResults)
End Sub
The „SearchCustomers“ method will do the searchy work and add the results to our bound result list.
As you may have already guessed, we will need that defined extension method from above.
First it will clear out already existing customers (if there are any), so that we are starting in a clean way.
Then it’s using the LINQ helper method called „Where“ to apply our defined filtering function coming in a second.
After we got our results, we can add them by the defined „AddRange“ method from the top of this post.
Performing the filtering by FilterCustomers method
Private Function FilterCustomers(customer As Customer) As Boolean
    Dim searchText = Me.SearchText.ToLower()
    Dim company = customer.Company.ToLower()
    Dim firstName = customer.FirstName.ToLower()
    Dim lastName = customer.LastName.ToLower()
    Return company.Contains(searchText) OrElse
        firstName.Contains(searchText) OrElse
        lastName.Contains(searchText)
End Function
Now it’s time to define the predicate function for doing the actual filter work.
A customer does match our filter criteria, if the value of the „SearchText“ property (lowered) is contained in:
- either, the company
- the first name
- or the last name
Keep an eye on that „OrElse“ operator, as it’s enough if just one of this boolean expressions match.
So by just using „Or“ it would still check all 3 expressions – which is inefficient!
Reacting to user pressing Enter – a UI/UX thingy
Private Sub tbSearch_KeyDown(sender As Object, e As KeyEventArgs) Handles tbSearch.KeyDown
    If e.KeyCode = Keys.Enter Then
        e.Handled = True
        ' disable DING sound
        e.SuppressKeyPress = True
        SearchCustomers()
    End If
End Sub
One basic functionality when creating some filtering mechanism should be to trigger the search by pressing a hotkey.
If the user presses the „Enter“ key inside the textbox, we will react by triggering the search.
But before finally triggering that search, we are setting the „Handled“ event argument property.
We are also setting the „SuppressKeyPress“ property, to avoid that annoying windows sided „DING“ sound.
Let’s talk about that „DataSourceUpdateMode“ thing I’ve mentioned a few moments ago.
This thing will configure the „SearchProperty“ actually getting changed live.
If we would not be using that, you could trigger the search by pressing enter, but the actual text wouldn’t be used.
This happens, because the input text of the textbox only gets „forwarded“ to our „SearchText“ after leaving the textbox!
So at the end of the first codes example, theres just one (or two things) left.
I’m talking about these two buttons whose click events need to be handled.
Private Sub btnResetSearch_Click(sender As Object, e As EventArgs) Handles btnResetSearch.Click
    tbSearch.Clear()
    SearchCustomers()
End Sub

Private Sub btnSearch_Click(sender As Object, e As EventArgs) Handles btnSearch.Click
    SearchCustomers()
End Sub
We are making sure, to reset the search and showing all customers when pressing the reset button.
Then we are handling the normal search button click by triggering the search process.
Conclusion

So now that we’ve come to the end of todays blog post, let’s do a quick recap.
When it comes to displaying data in a tabular style, you are almost guaranteed to stumble upon DataGridViews.
But – like as usual – in the daily life of being a programmer, you will face more requirements.
So even if you managed to display data inside a DataGridView, you will get more requests like filtering, sorting and more.
In todays post I showed you one possible way of filtering data inside that tabular standard control.
Next to that already existing method showed above, I think I will update this post in the future to show more.
