VB.NET Timer Example – Run Code at Intervals (2026)
The VB.NET Timer is the simplest way to execute code at a fixed interval. In this article I’ll show you step by step how to use the System.Windows.Forms.Timer correctly, how to avoid typical mistakes like timer overlap, and when the modern PeriodicTimer (.NET 6+) is the better choice.
Inhaltsverzeichnis
What do you need a Timer for?
Especially among beginners, the Timer is a popular control because you can simply drag it onto the Form and wire it up with code. However, there are a few things to watch out for, otherwise you might run into headaches.
If you already know how the Timer works but want to create a VB.NET Timer at runtime (DE), check out the linked article. For a step-by-step guide on building a VB.NET Timer Countdown (DE), there’s a separate post as well.
The purpose of a Timer
The first question you’ll probably ask yourself is: what’s the point of a Timer, and why do I need a control for it?
Execute code at an interval

At some point in every developer’s career, you’ll want to execute code on a recurring basis. That means a certain block of code should run again and again, with pauses in between. In other words: I want to „time“ my code 😉 and I’m looking for the right tool!
The first thing you’ll find is the Timer from the „System.Windows.Forms“ namespace. This is also the Timer that sits in the Controls Toolbox by default, so it’s most likely where you’ll start.
Execute code after a delay

Another common use case that people often search for alongside the Timer is executing code after a certain amount of time. For example, you might want your application to ping a server 5 seconds after launch. Or perhaps you’d like to fetch the current version number with a slight delay.
Sure, with the modern .NET framework there are „better“ alternatives to a Timer, but beginners still frequently run into these kinds of problems and end up reaching for the Timer. The same thing happened to me when I was starting out.
The 6 different Timers in .NET
Once you start researching, you’ll notice that different Timer classes pop up in various forum posts. If you dig deeper, you’ll find that .NET now has 6 different Timers. With .NET 6, the new PeriodicTimer was introduced, specifically designed for asynchronous background tasks.
That’s right, there are six of them!
The different Timers
For the sake of completeness, here they all are:
System.Windows.Forms.TimerSystem.Timers.TimerSystem.Threading.Timer- System.Threading.PeriodicTimer ← new (.NET 6+)
System.Web.UI.TimerSystem.Windows.Threading.DispatcherTimer
This article primarily focuses on the following, „standard“ Timer. As a beginner, don’t let the other Timers intimidate or confuse you!
System.Windows.Forms.Timer
The Timer control in detail
Now let’s take a closer look at the Timer control.
Constructors
The Timer control has 2 different constructors:
new()
The parameterless constructor, without any arguments.
new(container)
The constructor with a Container parameter. To keep things simple: this overload associates the Timer with a container. This happens automatically in the background when you drag the Timer from the Toolbox onto the Form. You can see this in the Form’s Designer code, but be careful not to break anything!
Me.Timer1 = New System.Windows.Forms.Timer(Me.components)
Properties
Here are the Timer’s most important properties:
Name
A standard property. This is the name you use to reference the Timer in your code.
Enabled
This value indicates whether the Timer is currently „running“, i.e. whether it’s firing its Tick event at the specified interval. It has effectively the same effect as the methods described below.
Interval
The Interval property sets (or gets) how frequently the Timer ticks, i.e. how often it executes your code. The default value is 100 milliseconds. A tip I read ages ago: don’t set the Timer interval below 18ms, since the human eye supposedly can’t perceive anything faster than that 😊. At least when you’re „timing“ something visual.
Tag
This property lets you attach custom data to the object. In simple terms: you can create your own class, instantiate it, and assign it to the control’s Tag. Later you can access that data by casting it back to the correct type.
Methods
Here are the most important methods of the Timer:
Start
Starts the Timer. This has effectively the same effect as setting the Enabled property to True.
Stop
Stops the Timer. This has effectively the same effect as setting the Enabled property to False.
Events
Tick
„Tick“ is the Timer’s most important event, where everything happens. This event fires at the specified interval and gives you the opportunity to execute code repeatedly – on the UI thread.
Practical example: Building a digital clock
Now that you know the Timer’s key properties and methods, let’s put that knowledge into practice.
Example – Digital clock
In our VB.NET Timer example, we’ll build a simple digital clock. Your first thought might be: „Okay, I need to display the current time every second“. Let’s take a look:
Drag the Timer onto the Form
To get started with the VB.NET Timer example, drag a Timer control onto your Form. Don’t be surprised that the control doesn’t appear directly on the Form, unlike a Button for example.
Instead, the Timer positions itself below the Form in a separate area:

When does it start?
First, we need to think about when the Timer should fire. In our example, you might say: every second, right? Nope, not quite! Why not? Let me try to illustrate with my extraordinary Paint skills 😄:
Remember playing hide and seek as a kid? The person counting did it roughly like this:
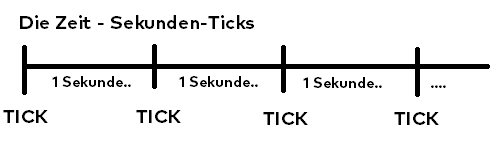
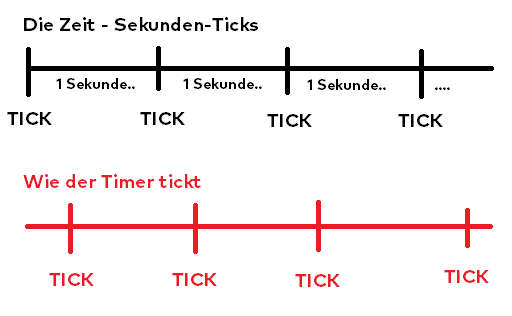
They started at 1 (the first tick), then waited 1 second and continued with 2, waited another second, 3, and so on. But just because our counter started in this rhythm doesn’t mean it’s synchronized with the actual clock. Besides the rhythm itself, the starting point plays a crucial role.
When your computer clock jumps to the next second, that doesn’t mean your Timer is making that same jump at that exact moment. This might be because we started counting just a few milliseconds earlier.
Now that the Timer is „on the Form“ and we understand this potential pitfall, we can start coding. The Timer’s default interval of 100ms should be fine for our clock.
Add code to the Tick event
Let’s add the code that displays the current time in a Label. Don’t forget to add a Label to the Form! I renamed Timer1 to something more fitting, e.g. tmrTime, and the Label to lblTime.
Private Sub tmrTime_Tick(sender As Object, e As EventArgs) Handles tmrTime.Tick
    lblTime.Text = DateTime.Now.ToString("HH:mm:ss")
End Sub
Let’s debug – VB.NET Timer Example
Start the program with F5 or click the Play button in Visual Studio. And? What happens? Nothing! 😂 Don’t forget to start the Timer in the Form_Load event (e.g. double-click the Form itself) using tmrTime.Start(). Alternatively, you can set the Timer’s „Enabled“ property to True in the Designer so it starts automatically.
Done – Here’s what the digital clock looks like
Here’s an animated image of my digital Timer clock:
Is your Timer ticking correctly?

I clearly remember a specific problem I had as a beginner. Hours went into research and the code was checked multiple times, until I finally found the culprit. I had built a calendar synchronization feature and ran into this issue.
Timer real-world example
The task – Calendar synchronization
Back at my first job, I was tasked with synchronizing calendar appointments. I had already built the calendar itself without too much trouble. What remained was displaying the appointments. The code itself wasn’t a problem either, until…
The synchronization loop
Since everything had to be done quickly, I grabbed a Timer, dragged it onto the Form, and started typing away in the Tick event handler. A few database queries here, some grouping there, a couple of loops, and it was done. Except for one strange bug…
The Timer „overlapped“
That was the root cause of the bug. Processing the data took longer than the Timer’s interval allowed before the next execution – oops!
Solution A:
Pause the Timer for as long as the Tick handler needs to process the data.
Solution B:
Increase the Timer’s interval.
Solution C:
Use a different approach, such as Async/Await.
My (back then) decision
Because I knew it by heart, I switched to the Async/Await approach. I replaced the Timer with an Async Sub (unfortunately unavoidable for event handlers), which performed its work in an internal loop at the desired interval.
The worst option
The worst option would probably be Solution B, because as soon as the workload increases with more data, you might end up facing the same problem again.
The optimal decision
The best solution back then would probably have been Option A. It would have required only a few extra lines of code: shame on me!
    Private Sub TheTimer_Tick(sender As Object, e As EventArgs) Handles TheTimer.Tick
        ' use this, or talk to the timer directly..
        Dim timer = CType(sender, Timer)
        ' stop the timer directly
        TheTimer.Stop();
        ' Data operations..
        ' start the timer again..
        TheTimer.Start()
    End Sub
For more complex background work, the VB.NET BackgroundWorker is a proven alternative. When accessing UI elements from another thread, make sure to follow the rules for cross-thread access.
Example – Execute code after a delay
In this section, we’ll look at another important use case. It’s about executing a block of code once after a certain delay, e.g. „do X after 5 seconds“.
Simply drag a Timer onto the Form and add the following code to the Tick event handler (e.g. by double-clicking the Timer):
Private Sub Timer1_Tick(sender As Object, e As EventArgs) Handles Timer1.Tick
  ' the code to be executed on each tick
End Sub
private void Timer1_Tick(object sender, EventArgs e)
{
  // the code to be executed on each tick
}
Note that if you’re using C#, you also need to take care of wiring the handler to the event. In VB.NET, this is done above via the „Handles clause“, or through a separate statement using „AddHandler„.
In C#, this is a separate statement in the Designer code:
// somewhere in the designer code
Timer1.Tick += Timer1_Tick;
If you created the handler by double-clicking the Timer, you don’t need to worry about this. Visual Studio creates the methods and the event wiring automatically. Next, you can set the Timer’s „Enabled“ property to „True“ in the Designer.
This would start the Timer automatically when the Form loads (if desired). Otherwise, you can always start the Timer manually using the „Start“ method. Set an appropriate interval, e.g. „5000“ (in milliseconds) for 5 seconds.
To ensure the code only runs once, we stop the Timer immediately in the first (and only) call of the Tick event handler.
Private Sub Timer1_Tick(sender As Object, e As EventArgs) Handles Timer1.Tick
  Timer1.Stop()
  ' do your thing
End Sub
private void Timer1_Tick(object sender, EventArgs e)
{
  Timer1.Stop();
  // do your thing
}
After that, you can execute your actual code and optionally restart the Timer later. However, make sure to check out how you could achieve this with modern framework features instead. I’ve written about asynchronous programming in VB.NET in a separate article.
Modern alternative: PeriodicTimer (.NET 6+)
Since .NET 6, there’s the System.Threading.PeriodicTimer, a modern, asynchronous alternative to the classic Timer control. It’s particularly well suited for background tasks without UI involvement:
Private Async Function StartPeriodicWorkAsync() As Task
  Using timer As New PeriodicTimer(TimeSpan.FromSeconds(5))
    While Await timer.WaitForNextTickAsync()
      ' Your code here — runs every 5 seconds
    End While
  End Using
End Function
The big advantage: the overlap problem from the example above doesn’t exist here. The next tick only fires after the previous one has finished. For new projects, the PeriodicTimer is often the better choice.
FAQ
For WinForms applications with UI interaction, use System.Windows.Forms.Timer. For background tasks without UI, use System.Timers.Timer or the new PeriodicTimer (.NET 6+).
The System.Windows.Forms.Timer runs on the UI thread. If your Tick handler takes too long (e.g. database queries), it blocks the interface. Solution: stop the Timer before processing and restart it afterwards, or use Async/Await.
The interval is specified in milliseconds. For 1 second, set Timer1.Interval = 1000. For 5 seconds, set Timer1.Interval = 5000.
System.Windows.Forms.Timer runs on the UI thread and is suitable for updating the interface. System.Timers.Timer runs on a thread pool thread and is better for background tasks, but requires Invoke for UI access.
Set the Timer interval to the desired delay (e.g. 5000 for 5 seconds) and call Timer1.Stop() as the first line in the Tick handler. This way the code only runs once. Alternatively, use Await Task.Delay() for a more modern approach.
Wrapping up
The System.Windows.Forms.Timer is the quickest way to execute code at a fixed interval. Make sure to stop the Timer before long-running processing and restart it afterwards to avoid overlap issues. For new projects without UI involvement, take a look at the PeriodicTimer available since .NET 6.